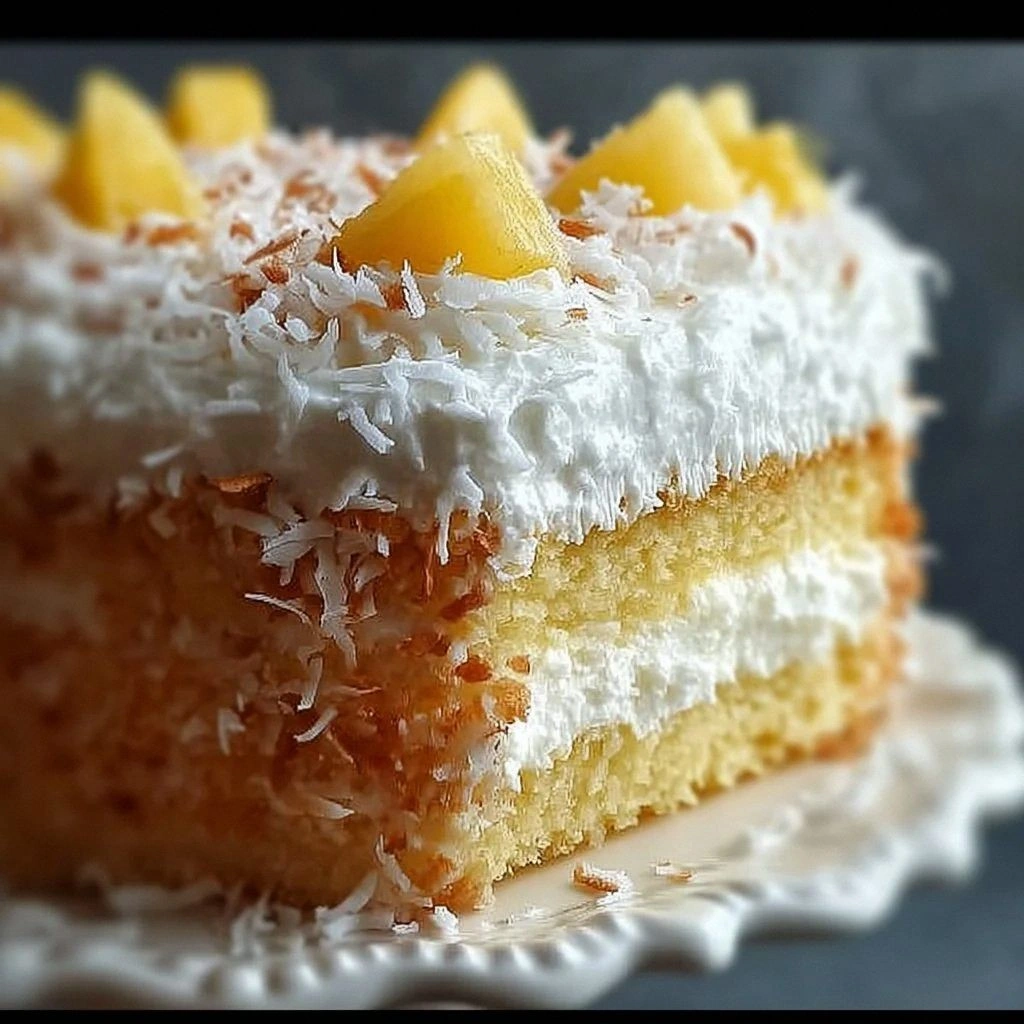
Picture this: a kitchen humming with the scent of fresh pineapple, the buttery aroma of melting butter, and the sweet whisper of coconut. I was halfway through a week of bland desserts, craving something that feels like a vacation. Then a friend dared me to make a cake that could transport us to a tropical beach, no matter the season. I pulled out my pantry, grabbed the ingredients, and decided to take the bold route. The result? A cake that practically sings with sunshine. I couldn't wait to share the recipe that will make your taste buds do a happy dance.
First, I remember the moment the batter first hit the pan—an audible sigh of steam that promised fluffiness. The kitchen filled with a sweet, caramelized scent as the butter and sugar melted together, forming a silky base. I could almost hear the ocean waves in the background, each bubble a tiny wave of flavor. The mixture felt warm, almost like a hug, and I knew I was on the right track. The pineapple juice added a subtle tartness, cutting through the richness without overpowering it. The coconut whispered its presence, giving texture and a hint of toasted sweetness.
What sets this cake apart is that it doesn’t rely on heavy frostings or artificial flavorings; the natural sweetness of pineapple and coconut carry the whole thing. The batter’s lightness keeps the crumb airy, so you get that signature cake feel rather than a dense, heavy dessert. The combination of butter, eggs, and vanilla creates a silky foundation that lets the tropical notes shine. I dare you to taste this and not go back for seconds—once you bite, you’ll crave the next slice. The glaze at the end adds a glossy finish that looks as good as it tastes. The final result is a cake that feels like a tropical getaway in every bite.
I’ve experimented with countless cake recipes, and this one feels like a fresh breeze after a summer storm. The secret? A balanced ratio of wet to dry, a generous splash of pineapple juice, and a sprinkle of shredded coconut that’s toasted just enough to pop. The trick of folding the ingredients gently preserves the batter’s airy structure, preventing it from becoming dense. When you pull this out of the oven, the whole kitchen smells like a sunny beach—sweet, citrusy, and comforting. The cake cools quickly, making it a great option for last‑minute celebrations. I’ve already shared it with friends, and their reactions have been nothing short of ecstatic.
If you’re ready for a cake that will make you question why you ever settled for plain vanilla, keep reading. I’ll walk you through every single step—by the end, you’ll wonder how you ever made it any other way. Let’s dive into the details, from the humble flour to the final glaze, and discover why this Pineapple Coconut Dream Cake is a game changer.
What Makes This Version Stand Out
- Taste: The pineapple gives a natural sweetness that cuts through the butter, while the coconut adds a subtle nutty undertone. The result is a balanced flavor profile that feels both indulgent and refreshing.
- Texture: The batter is light and airy, thanks to the careful folding technique. The cake rises evenly, giving it a tender crumb that melts in your mouth.
- Simplicity: No fancy equipment is required—just a bowl, whisk, and a 9‑inch pan. This makes it accessible to anyone, even novice bakers.
- Uniqueness: The use of crushed pineapple with its juice creates a moistness that is rarely achieved in standard cakes. The shredded coconut adds a pleasant chew and visual appeal.
- Crowd Appeal: At parties, this cake becomes a conversation starter. Guests often ask for the recipe after the first bite.
- Make‑Ahead Potential: The cake can be baked and cooled, then stored in the fridge for up to three days. The glaze can be applied just before serving.
- Ingredient Quality: Using fresh pineapple and high‑quality butter elevates the entire dessert. The quality of each component shines through.
Inside the Ingredient List
The Flavor Base
All‑purpose flour is the backbone of the cake, giving it structure and a classic crumb. It absorbs the wet ingredients, allowing the batter to rise without becoming heavy. If you’re a gluten‑free baker, a 1:1 substitute works perfectly, though you may need to add a pinch of xanthan gum to mimic elasticity. The flour’s neutral taste lets the tropical flavors shine.
The Texture Crew
Granulated sugar is the sweetener that caramelizes slightly during baking, adding a subtle depth of flavor. Unsweetened shredded coconut provides both crunch and a subtle nuttiness that lingers on the palate. The coconut’s texture contrasts the soft cake, preventing the dessert from feeling mushy. When toasted just before mixing, it releases a warm aroma that enhances the overall sensory experience.
The Unexpected Star
Crushed pineapple, with its juice, is the secret moisture factor. The natural sugars in pineapple balance the richness of butter, creating a moist yet not soggy crumb. If you prefer a fresher taste, use fresh pineapple, but make sure to drain it thoroughly to avoid excess liquid. Pineapple also adds a subtle acidity that brightens the entire cake.
The Final Flourish
Unsalted butter brings a rich, creamy base that melts into the batter, giving the cake a velvety mouthfeel. Eggs act as a binder and leavening agent, helping the cake rise and hold its shape. Vanilla extract unlocks the flavors, adding depth and a warm undertone that complements the sweet fruit. A pinch of salt is essential; it balances sweetness and brings out the natural flavors in every bite.
Everything’s prepped? Good. Let’s get into the real action...
The Method — Step by Step
- Preheat your oven to 350°F (175°C). Grease a 9‑inch round cake pan and line the bottom with parchment paper. This prevents sticking and makes removal a breeze. Let the pan sit while you prepare the batter; a warm pan keeps the batter from cooling too quickly.
- In a medium bowl, whisk together the flour, baking powder, and salt. The dry mixture should feel light and airy. Set aside; this will be incorporated into the wet batter in a gentle fold.
- In a large bowl, beat the softened butter and granulated sugar with an electric mixer until the mixture is pale and fluffy—about three minutes. Add the vanilla extract, then one egg at a time, mixing well after each addition. The batter should feel smooth and glossy, a sign that the butter and sugar have fully integrated.
- Alternately fold the dry ingredients and pineapple juice into the wet mixture, starting and ending with the dry. Use a spatula for a gentle fold; over‑mixing will develop gluten and make the cake dense. Add the shredded coconut last, folding just enough to distribute it evenly. The batter should be thick but pourable.
- Pour the batter into the prepared pan, smoothing the top with a spatula. Tap the pan lightly on the counter to release any air pockets. The batter should spread evenly, forming a smooth surface that will bake into a golden dome.
- Bake for 30–35 minutes, or until a toothpick inserted into the center comes out clean. Watch out: if the cake starts browning too fast, tent it loosely with foil to prevent over‑browning while the center finishes. The edges should pull away slightly from the pan, indicating readiness.
- Let the cake cool in the pan for ten minutes before transferring it to a wire rack to cool completely. This short rest allows the cake to set and makes slicing easier. If you try to slice immediately, the cake may crumble or stick to the pan.
- While the cake cools, whisk together pineapple juice and powdered sugar until you achieve a silky glaze. The glaze should pour smoothly over the cake, creating a glossy finish. Once the cake is fully cooled, drizzle the glaze over the top, allowing it to set for a minute before cutting.
- Serve immediately or refrigerate for up to three days. The glaze can be refreshed with a splash of pineapple juice if it dries out. Slice with a sharp knife to avoid crushing the delicate crumb.
Insider Tricks for Flawless Results
The Temperature Rule Nobody Follows
Many bakers bake at the lowest temperature they can find, but this cake thrives at a steady 350°F. A consistent temperature ensures even rising and a golden crust. If your oven runs hot, rotate the pan halfway through baking. The trick is to let the batter settle in the middle of the oven for optimal heat distribution.
Why Your Nose Knows Best
The aroma of the cake as it bakes is a reliable indicator of readiness. A sweet, caramelized scent means the sugars are caramelizing just right. If the smell is too fruity, you may be underbaking; too buttery, and you’re overbaking. Trust that sweet scent and use the toothpick test as confirmation.
The 5‑Minute Rest That Changes Everything
After removing the cake from the oven, let it rest for exactly five minutes before sliding it onto the rack. This short pause allows the cake to set, preventing cracks and a sticky surface. A quick rest also lets the flavors meld together, creating a more cohesive taste profile.
The Quick Chill Trick
If you’re in a hurry to serve, place the cake in the fridge for fifteen minutes after it’s cooled. This chill hardens the glaze slightly, making slicing cleaner. It also gives the coconut a firmer bite, adding a nice contrast to the soft cake.
The Fresh‑Pineapple Swap
Using fresh pineapple instead of canned gives a brighter flavor, but it also adds moisture. To counteract the extra liquid, reduce the amount of pineapple juice by one tablespoon. This keeps the batter from becoming too runny while still delivering that fresh pineapple zing.
The Flavor Layering Technique
When folding in the coconut, sprinkle a thin layer over the batter before the final fold. This creates a visible band of coconut that adds visual interest and a concentrated burst of flavor. It also prevents the coconut from sinking to the bottom of the cake.
Creative Twists and Variations
Tropical Lime Twist
Swap half of the pineapple juice with fresh lime juice for a citrusy kick. The lime’s acidity brightens the cake and complements the coconut. Add a pinch of zest to the batter for an extra burst of flavor. Guests will love the zesty, tropical vibe.
Chocolate Coconut Explosion
Fold in a handful of dark chocolate chips before baking for a decadent chocolate‑coconut combo. The chocolate melts into the cake, creating pockets of rich flavor. Use semi‑sweet chips to keep the overall sweetness balanced. This version is perfect for chocolate lovers.
Nutty Banana Boost
Replace the pineapple with mashed ripe banana for a sweeter, denser cake. The banana adds natural sweetness and moisture, while the coconut still provides texture. Pair it with a drizzle of honey for a caramelized finish. This variation works great for brunch or a sweet snack.
Almond‑Infused Delight
Replace the all‑purpose flour with almond flour for a nutty base. The almond flour adds a subtle nut flavor that pairs well with coconut. Adjust the baking powder by 1/4 teaspoon to compensate for the denser flour. The result is a gluten‑free, protein‑rich cake.
Spiced Coconut Surprise
Add a pinch of ground ginger and cinnamon to the dry mix for a warm, spiced undertone. The spices complement the tropical flavors and add depth. This version is especially good for fall gatherings. The aroma will draw people in even before they taste it.
Vegan Coconut Dream
Replace butter with coconut oil and use flax eggs (1 tablespoon ground flaxseed mixed with 2.5 tablespoons water per egg). Substitute milk with coconut milk to keep the flavor consistent. The cake will have a slightly denser crumb but still moist and flavorful. This vegan version satisfies everyone at the table.
Storing and Bringing It Back to Life
Fridge Storage
Wrap the cooled cake tightly in plastic wrap and store it in an airtight container. It will stay fresh for up to three days, maintaining its moistness. When you’re ready to serve, let it sit at room temperature for fifteen minutes to soften the glaze. This short wait restores the cake’s original texture.
Freezer Friendly
Freeze the cake in a freezer‑safe container, wrapped in parchment and then plastic wrap. It can be stored for up to two months. Thaw overnight in the fridge, then let it come to room temperature before serving. The coconut remains tender and the glaze stays glossy.
Best Reheating Method
To revive a refrigerated or frozen cake, preheat your oven to 300°F (150°C). Place the cake on a baking sheet and cover loosely with foil. Warm for 10–12 minutes, then remove the foil and allow the glaze to set for an additional minute. A tiny splash of pineapple juice before reheating adds steam, keeping the cake moist.