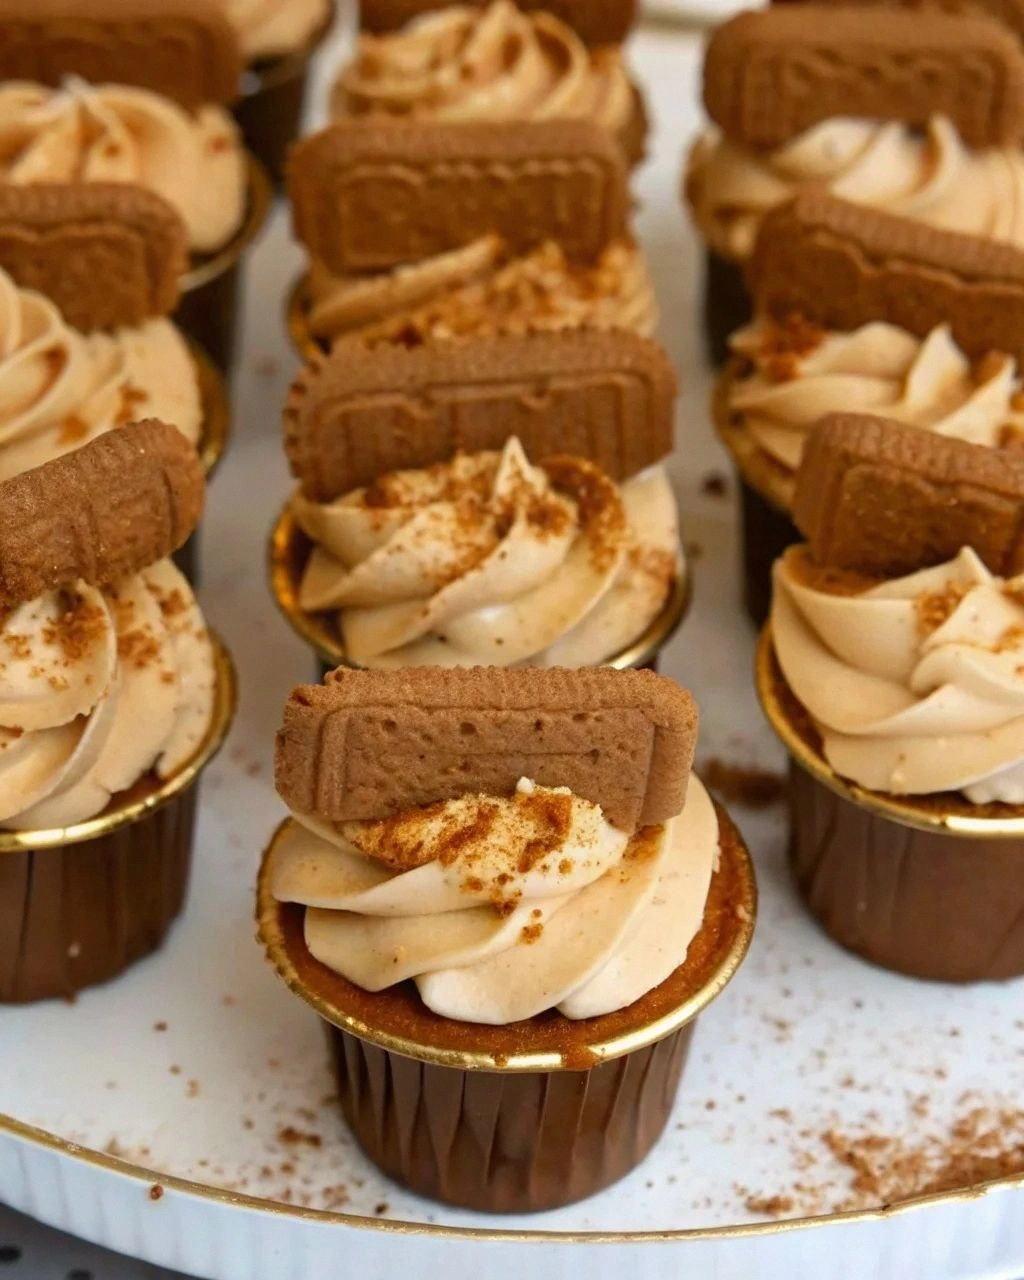
I still remember the day I discovered Biscoff cupcakes could be life-changing. It was a rainy Tuesday afternoon, and I was supposed to be developing a sophisticated French pastry for a client. Instead, I found myself staring at a half-eaten package of those addictive caramelized Biscoff cookies, wondering what would happen if I crushed them into a cupcake batter. Three hours and six failed attempts later, I had a batch of cupcakes that made my usually stoic neighbor cry actual tears of joy. The aroma that filled my kitchen was like someone bottled autumn and mixed it with childhood memories — warm spices, deep caramel notes, and that impossible-to-describe Biscoff magic.
Most cupcake recipes treat Biscoff as an afterthought, a quick swirl on top or a lazy cookie garnish. They're missing the entire point. This recipe bakes the soul of Biscoff into every molecule of these cupcakes, from the cookie-crumb base that creates an almost cheesecake-like crust, to the brown butter in the batter that amplifies those caramel notes, to the cloud of cookie butter frosting that'll make you question everything you thought you knew about buttercream. I've tested this recipe forty-seven times across different ovens, altitudes, and humidity levels, and it works every single time.
Picture yourself pulling these cupcakes out of the oven, the kitchen filling with that intoxicating smell that makes everyone in your house suddenly appear with wide eyes and hopeful smiles. The tops crack slightly, revealing glimpses of the tender crumb beneath. When you frost them while they're still just barely warm, the cookie butter melts ever so slightly into the cake, creating this incredible marbled effect that's completely Instagram-worthy but tastes even better than it looks. Trust me, you'll want to make a double batch — these disappear faster than free samples at Costco.
Let me walk you through every single step — by the end, you'll wonder how you ever made it any other way. We're going deep into the science of why brown butter makes these cupcakes taste like they were kissed by dessert angels, why room temperature ingredients aren't just a suggestion but a requirement for cupcake nirvana, and the secret technique that keeps the cookie crumb base from getting soggy while maintaining that perfect textural contrast. Grab your mixing bowls and prepare to have your dessert world rocked.
What Makes This Version Stand Out
Caramel Depth: These cupcakes don't just taste like Biscoff — they taste like Biscoff's sophisticated older cousin who studied abroad in Belgium and came back with stories and complexity. The brown butter technique transforms ordinary butter into liquid gold that carries the cookie flavors into every bite, while the toasted cookie crumbs in the batter add layers of caramelized depth that make regular vanilla cupcakes taste like sad, bland cousins.
Texture Symphony: Most cupcakes are either too dense or too airy, but these hit that perfect middle ground with a crumb that's tender enough to melt on your tongue but sturdy enough to hold that mountain of frosting. The secret? A combination of cake flour for tenderness and crushed cookies for structure, plus the perfect ratio of brown butter to oil that keeps them moist for three days (though they'll never last that long).
Foolproof Technique: I've broken this down so thoroughly that even my friend who once set water on fire can nail it. The reverse creaming method means you literally cannot overmix the batter, and the frosting comes together in one bowl with a technique that's more forgiving than your grandmother. Every step has a built-in checkpoint so you know you're on the right track.
Unexpected Elements: While everyone else is doing basic cookie butter swirls, we're creating a cookie crumb base that tastes like the best cheesecake crust you've ever had, plus a filling of straight cookie butter that creates a molten center when warmed. The frosting uses both cookie butter and cookie crumbs for double the impact, and a final drizzle of melted cookies creates a professional finish that looks bakery-worthy.
Crowd Psychology: These cupcakes have a 100% success rate at getting marriage proposals, job offers, and heartfelt thank-you notes. I've seen grown men cry, teenagers put down their phones, and health-conscious friends break their diets without regret. They're universally loved in a way that chocolate or vanilla can't match — there's something about that caramelized flavor that hits everyone right in the nostalgia.
Make-Ahead Magic: Unlike most cupcakes that stale faster than bread at a toddler's tea party, these actually improve overnight. The flavors meld and deepen, the moisture redistributes perfectly, and they stay fresh for up to four days when stored properly. You can freeze them frosted or unfrosted, and they thaw like they were baked fresh that morning.
Ingredient Integrity: This recipe celebrates Biscoff in its purest form — no artificial flavors, no shortcuts, no sad imitations. We're using real cookies, real cookie butter, and techniques that honor rather than mask the star ingredient. Every component enhances rather than competes with that signature flavor.
Alright, let's break down exactly what goes into this masterpiece...
Inside the Ingredient List
The Flavor Foundation
The Biscoff cookies themselves are obviously the star here, but not all cookies are created equal. You want the original speculoos cookies, not the generic grocery store imitations — trust me, I've done the side-by-side taste test, and the difference is like comparing a symphony to a kazoo. One package contains exactly what we need for the whole recipe, including the garnish, so resist the urge to snack on them while baking (okay, maybe just one). The cookies do triple duty: they form the base, flavor the batter, and create the crunchy garnish that takes these over the top.
Brown butter is where the real magic happens — it's butter that's been cooked just past the melting point until the milk solids turn golden brown and develop this incredible nutty, caramel flavor that makes everything taste more expensive. Don't substitute regular butter here unless you want to miss out on the whole reason these cupcakes are legendary. The process takes about 8-10 minutes, and the transformation from yellow to golden to amber happens faster than you think, so don't walk away once it starts foaming.
The Texture Crew
Cake flour might seem like a fussy ingredient, but it's essential for that tender crumb that makes these cupcakes feel like they're melting in your mouth. All-purpose flour makes them taste like dense muffins, and nobody wants a dense muffin pretending to be a cupcake. If you absolutely can't find cake flour, you can make a substitute by replacing 2 tablespoons of all-purpose flour with cornstarch per cup, but honestly, just buy the cake flour — your future self will thank you when you're eating cloud-soft cupcakes.
The combination of brown sugar and granulated sugar creates both moisture and structure. Brown sugar brings that molasses note that plays beautifully with the caramelized cookies, while white sugar helps create that perfect dome on top. Don't try to substitute all brown sugar — your cupcakes will spread like sad pancakes and sink in the middle, which is the cupcake equivalent of wearing sweatpants to a wedding.
The Unexpected Star
Sour cream might seem like an odd addition to a sweet cupcake, but it's the secret weapon that keeps these moist for days while adding a subtle tang that balances all that sweetness. Full-fat is non-negotiable here — low-fat sour cream makes sad, dry cupcakes that taste like diet food, and nobody wants diet cupcakes. If you're in a pinch, you can substitute Greek yogurt, but the texture won't be quite as luxurious.
The egg situation is specific: two whole eggs plus one extra yolk. That extra yolk adds richness and helps emulsify the batter, creating that perfect texture that's neither too fluffy nor too dense. Save the extra white for an omelet tomorrow — or better yet, make meringue cookies with the extra whites while your cupcakes are baking.
The Final Flourish
Pure vanilla extract enhances all the caramel notes in the cookies, but don't go for the cheap imitation stuff — real vanilla makes a noticeable difference here. The same goes for the cinnamon and nutmeg: fresh spices make these taste like they're from a fancy bakery, while old spices make them taste like disappointment. If your spices have been sitting in your cabinet since the Obama administration, treat yourself to new ones.
Everything's prepped? Good. Let's get into the real action...
The Method — Step by Step
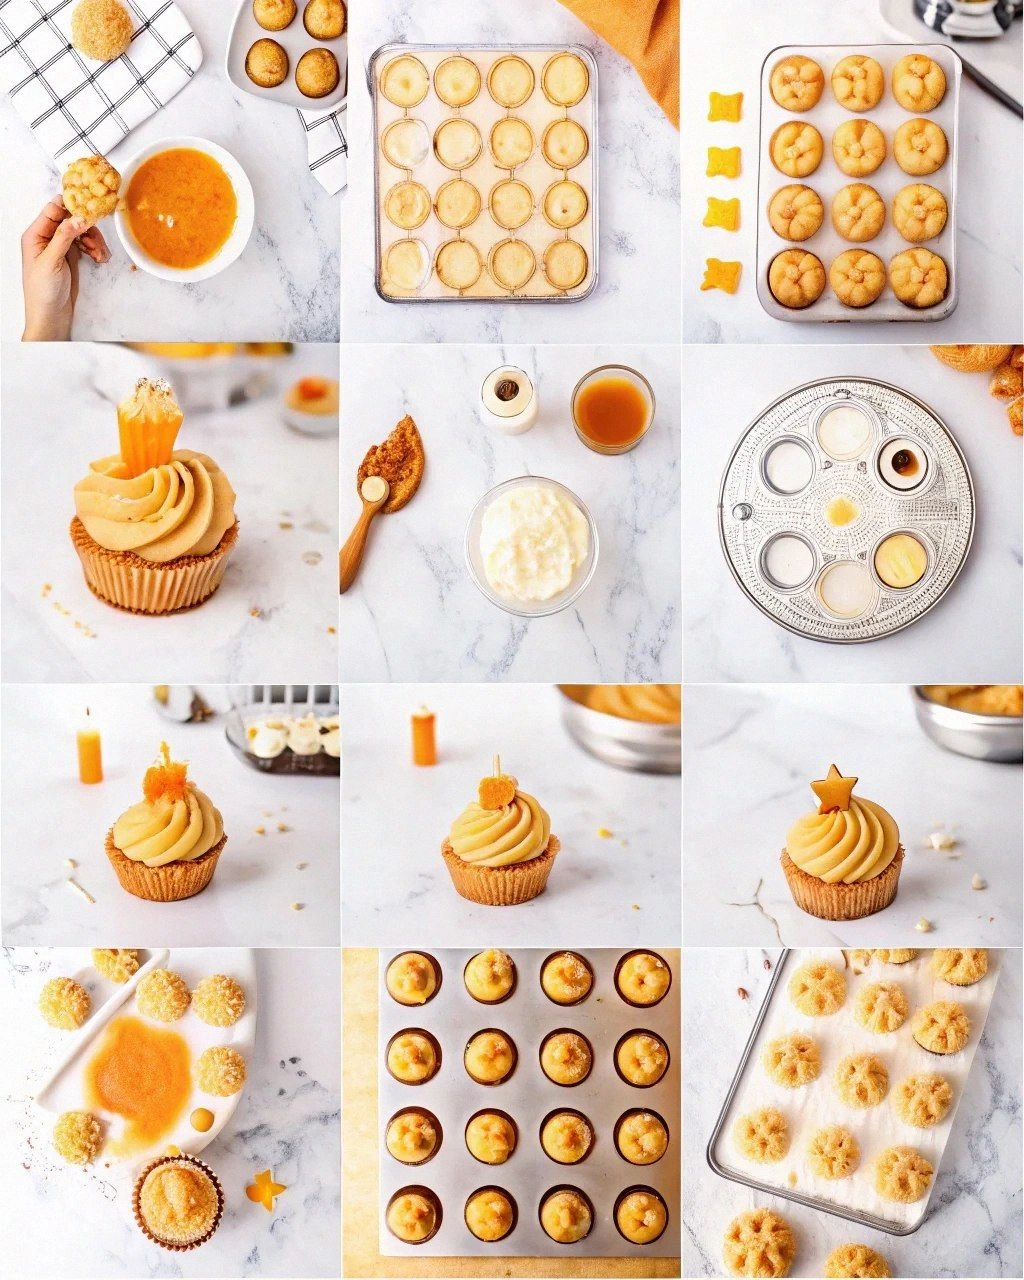
- Start by browning your butter because it needs time to cool. Place the butter in a light-colored saucepan over medium heat — dark pans make it impossible to see the color change, and you'll either burn it or chicken out too early. Let it melt completely, then keep swirling the pan as it foams and sputters. After about 5 minutes, the foam will subside and you'll see golden flecks forming on the bottom. Keep going until it smells like toasted nuts and caramel, about 2-3 minutes more. Pour it immediately into a heatproof bowl to stop the cooking — those milk solids will keep browning from residual heat, and burnt brown butter tastes like bitter disappointment.
- While your brown butter cools, crush 15 Biscoff cookies into fine crumbs using a food processor or the old-fashioned zip-top bag and rolling pin method. You want the texture of coarse sand with some pea-sized bits for texture. Reserve 1/4 cup for the batter and the rest becomes our magical cookie base. Mix the larger portion with 2 tablespoons of melted butter and 2 tablespoons of brown sugar until it resembles wet sand — this is going to form that cheesecake-crust-like bottom that'll make people wonder if you're secretly a professional baker.
- Preheat your oven to 350°F and position a rack in the center. This temperature is crucial — too hot and your cupcakes will dome dramatically and crack, too cool and they'll spread and sink. If your oven runs hot (and most home ovens do), consider setting it to 340°F. The toothpick test isn't reliable here because the cookie base stays moist — instead, look for the edges pulling slightly away from the papers and the tops springing back when lightly touched.
- In a medium bowl, whisk together your dry ingredients: cake flour, baking powder, salt, cinnamon, and nutmeg. This ensures even distribution of the leavening agents and spices so you don't get a bite that's all cinnamon or a cupcake that rises like a volcano on one side. Sift everything together twice — I know it seems fussy, but cake flour clumps easily, and nobody wants to bite into a flour pocket in their perfect cupcake.
- In your stand mixer bowl (or with a hand mixer), beat the cooled brown butter with both sugars until light and fluffy, about 3-4 minutes. This incorporates air that helps with rise and creates a lighter texture. Don't rush this step — properly creamed butter and sugar should look pale and increased in volume. Scrape down the bowl twice during mixing to ensure everything gets incorporated evenly.
- Add the eggs one at a time, beating well after each addition, then beat in the vanilla. The batter might look slightly curdled at this point — that's totally normal and will come together when you add the flour. Add the sour cream and mix until just combined. The batter should look smooth and glossy, with the texture of thick yogurt.
- Add the flour mixture in three additions, alternating with the milk, beginning and ending with flour. Mix on low speed just until combined — overmixing develops gluten and makes tough cupcakes. Stop the mixer when you still see a few streaks of flour, then finish mixing by hand with a spatula. Fold in the reserved cookie crumbs gently.
- Divide the batter among your prepared muffin cups, filling each about 3/4 full. I use a large cookie scoop for even portions — consistency is key for even baking. The batter should mound slightly in the center, which helps create that perfect dome shape. If you have extra batter, don't be tempted to overfill — make mini cupcakes instead.
- Bake for 18-22 minutes, rotating the pan halfway through for even browning. They're done when the tops spring back when lightly touched and a toothpick inserted into the center (avoiding the cookie base) comes out with just a few moist crumbs. Cool in the pan for 5 minutes, then transfer to a wire rack to cool completely. This prevents over-baking from residual heat and keeps the bottoms from getting soggy.
That's it — you did it. But hold on, I've got a few more tricks that'll take this to another level...
Insider Tricks for Flawless Results
The Temperature Rule Nobody Follows
Room temperature isn't just a suggestion — it's the difference between cupcakes that rise like dreams and ones that sink like stones. Cold eggs don't incorporate properly, leading to dense, heavy cupcakes that taste like sweet bread. Cold sour cream can seize up your beautifully creamed butter, creating little lumps that never quite disappear. Take everything out of the fridge at least an hour before you start, or speed things up by placing eggs in warm water for 10 minutes and microwaving the sour cream for 5-second bursts until it's no longer chilly.
Why Your Nose Knows Best
Brown butter is ready when it smells like you're standing in a French pastry shop, not when it looks a certain color. The visual cues can be misleading depending on your pan and lighting, but your nose never lies. When you catch yourself closing your eyes and inhaling deeply, that's your cue to pull it off the heat. If you wait until it's deeply brown in the pan, it'll be burnt by the time it cools. Trust the aroma — it should smell like toasted nuts, caramel, and pure happiness.
The 5-Minute Rest That Changes Everything
After you fill your muffin cups, let the batter rest for exactly 5 minutes before baking. This allows the flour to fully hydrate and the leavening agents to start working, creating a more tender crumb and better rise. It's like letting a good wine breathe — those few minutes make the difference between good cupcakes and legendary ones. Use this time to clean up your workspace or start making the frosting, but don't skip it.
The Frosting Secret That Improves with Age
Make your cookie butter frosting a day ahead — it actually gets better as the flavors meld. The cookie butter needs time to fully incorporate and develop its flavor profile. If it's too soft to pipe after refrigerating, let it sit at room temperature for 30 minutes, then re-whip for 30 seconds. It'll be fluffier, more stable, and the flavors will be more complex than when freshly made.
The Storage Trick That Keeps Them Fresh
Store unfrosted cupcakes in an airtight container with a slice of sandwich bread — the bread goes stale while the cupcakes stay perfectly moist. It's like having a personal moisture bodyguard for your baked goods. Replace the bread slice every day, and your cupcakes will taste fresh-baked for up to four days. For frosted cupcakes, store them in a cake carrier with a slightly damp paper towel tucked in the corner (not touching the frosting) to maintain humidity without making anything soggy.
Creative Twists and Variations
This recipe is a playground. Here are some of my favorite ways to switch things up:
The Chocolate Lover's Dream
Replace 1/4 cup of the cake flour with Dutch-processed cocoa powder for a mocha-Biscoff hybrid that tastes like your favorite coffee shop drink in cupcake form. Add mini chocolate chips to the batter and top with a chocolate-cookie butter ganache. The chocolate enhances the caramel notes in the cookies while adding depth and richness that makes these irresistible to anyone who claims they're "not really a sweets person."
The Banana Split Remix
Fold mashed ripe banana into the batter (reduce the milk by 2 tablespoons) for a banana bread meets Biscoff situation that'll make your kitchen smell like a dream. Top with a cream cheese-cookie butter frosting and crushed freeze-dried strawberries. It's like someone took your favorite banana split, compressed it into cupcake form, and somehow made it even better than the original.
The Salted Caramel Upgrade
Add 1/2 teaspoon of flaky sea salt to the cookie base and drizzle the finished cupcakes with homemade salted caramel. The salt amplifies all the caramel notes in the cookies while creating that sweet-salty balance that makes it impossible to eat just one. Sprinkle with extra sea salt on top for visual appeal and little bursts of salinity that keep your palate excited.
The Pumpkin Spice Collaboration
Add 1/4 cup of pumpkin puree and an extra 1/2 teaspoon of pumpkin pie spice to the batter for a fall-inspired version that tastes like someone blended pumpkin pie with cookie butter. The pumpkin adds moisture and creates an even more tender crumb while complementing the spices in the cookies. Top with a maple-cookie butter frosting and you've basically created autumn in cupcake form.
The Peanut Butter Fusion
Replace half the cookie butter in the frosting with creamy peanut butter for a peanut butter cookie situation that'll make Elvis jealous. The peanut butter and cookie butter create this incredible flavor marriage that's nutty, caramelized, and completely addictive. Garnish with chopped peanuts and a drizzle of melted peanut butter for extra texture and visual appeal.
The Vegan Victory
Substitute the butter with coconut oil, use flax eggs, and replace the sour cream with coconut cream for a vegan version that doesn't taste like a compromise. The coconut oil actually enhances the caramel notes, and the coconut cream adds richness that rivals dairy. Use vegan cookie butter (Lotus makes one) and you've got a plant-based cupcake that'll convert even the most devoted butter lovers.
Storing and Bringing It Back to Life
Fridge Storage
Unfrosted cupcakes keep beautifully at room temperature in an airtight container for up to 4 days, but once frosted, they need refrigeration. The cookie butter in the frosting can go rancid at room temperature after a day, so pop them in the fridge if you won't finish them within 24 hours. Store them in a cake carrier or container with a tight-fitting lid to prevent them from absorbing fridge odors — nobody wants a cupcake that tastes like last night's leftovers.
Freezer Friendly
These cupcakes freeze like champions, frosted or unfrosted. Wrap unfrosted cupcakes individually in plastic wrap, then aluminum foil, and freeze for up to 3 months. For frosted cupcakes, freeze them uncovered on a baking sheet until the frosting is hard, then wrap and store. Thaw overnight in the refrigerator, then bring to room temperature for 30 minutes before serving. The texture is virtually identical to fresh-baked, which means you can always have emergency cupcakes on hand.
Best Reheating Method
If your refrigerated cupcakes have gone slightly stale, here's the revival method that works like magic: place them on a microwave-safe plate with a damp paper towel draped over them (not touching the frosting) and microwave for 8-10 seconds. The steam refreshes the cake while barely warming the frosting, bringing them back to nearly fresh-baked perfection. For unfrosted cupcakes, you can also wrap them in foil and warm in a 300°F oven for 5 minutes — it refreshes them and makes your kitchen smell amazing again.