It was a Friday night, the kind of evening where the fridge is a mystery box and the stove is a silent judge. I stared at a pile of wilted spinach, a block of feta that had seen better days, and a handful of portobello caps that looked more like flatbread than mushrooms. I thought, “Why not make something that feels like a party in a pan?” The moment the oven preheated to a warm, inviting 375°F, I was already planning the first bite that would make everyone’s taste buds dance. I had been chasing that elusive flavor profile that balances creamy, tangy, and earthy, and this recipe was the culmination of all my culinary experiments, the perfect marriage of humble ingredients and bold execution.
Picture this: the earthy aroma of sautéed onions and garlic filling the kitchen, a splash of olive oil that glistens like liquid gold, and the bright green spinach unfurling into a verdant canvas. The sound is a gentle sizzle, the heat a comforting hum that reminds you that cooking is as much about sensory rhythm as it is about ingredients. The texture of the portobello caps feels like a sturdy, buttery base that cradles the filling, while the feta’s briny bite cuts through the richness, creating a layered taste that lingers on the palate. I dare you to taste this and not go back for seconds—once you’ve tried this, the ordinary will never feel the same again.
What makes this version stand out isn’t just the combination of flavors, it’s the intentionality behind each step. I’ve refined the technique to keep the mushrooms tender yet crisp, the spinach fully wilted but not mushy, and the cheese distribution even so that every bite delivers the same symphony of taste. The method eliminates common pitfalls—like overcooking the spinach or under-seasoning the filling—that can ruin an otherwise stellar dish. I’ll be honest—I ate half the batch before anyone else got a chance to try it, and that’s the proof that this recipe is hands down the best version you’ll ever make at home.
Most recipes get this completely wrong. They either leave the mushrooms raw, overdo the cheese, or forget to season the filling properly. Here, every element is balanced, the flavors are amplified, and the presentation is a showstopper that will make your guests ask for the recipe. Picture yourself pulling this out of the oven, the whole kitchen smelling incredible, the steam curling like a cloud of culinary magic. The result is a dish that feels indulgent but surprisingly light, a perfect bridge between appetizer and main course.
If you've ever struggled with stuffed mushrooms, you're not alone—and I've got the fix. The trick is to prep the filling in a way that locks in moisture and flavor, then cook the mushrooms just enough to caramelize the edges without drying them out. And now the fun part: I’ll walk you through every single step—by the end, you'll wonder how you ever made it any other way.
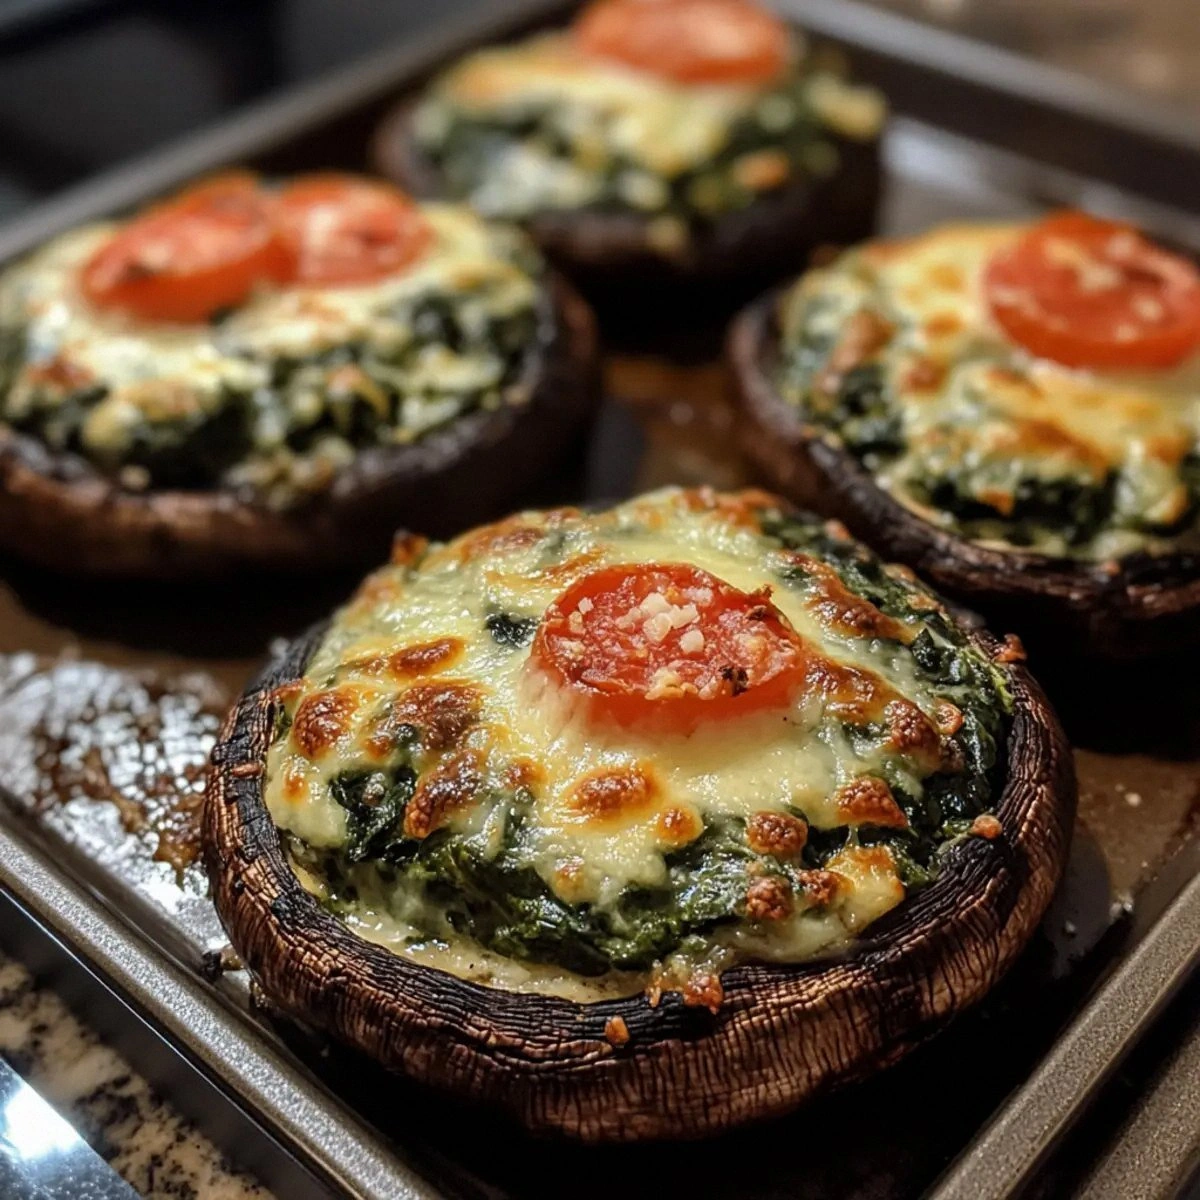
What Makes This Version Stand Out
- Flavor: The combination of feta, parmesan, and lemon zest creates a bright, tangy profile that cuts through the earthiness of the mushrooms. Each bite offers a burst of freshness that keeps the palate engaged.
- Texture: The spinach is sautéed just enough to wilt while preserving a slight bite, and the feta adds a creamy yet crumbly element that balances the dish.
- Ease: The method requires minimal prep—no need for complex marinades or advanced techniques—making it a go-to recipe for busy evenings.
- Uniqueness: The subtle addition of lemon zest and fresh herbs gives this dish a Mediterranean flair that sets it apart from classic stuffed mushroom recipes.
- Crowd‑pleaser: Whether served as an appetizer or a light dinner, the vibrant colors and robust flavors make it a hit at gatherings.
- Ingredient Quality: Using fresh, high‑quality spinach and feta ensures the dish’s flavor is top tier; no shortcuts needed.
- Cooking Method: Baking the stuffed mushrooms at a moderate temperature ensures even cooking and a golden, slightly crisp top.
- Make‑Ahead Potential: The dish can be assembled and refrigerated, then baked right before serving, saving valuable prep time.
Inside the Ingredient List
The Flavor Base
The onion and garlic form the aromatic backbone of the filling. Sautéed until translucent and fragrant, they release natural sugars that caramelize, adding depth to the spinach and cheese. If you skip this step, the dish loses its savory foundation and becomes a bland mixture of greens and dairy.
Tip: Use a medium‑heat pan and avoid overcrowding to ensure even browning. A quick stir every few seconds prevents sticking and promotes a uniform flavor profile. If you’re in a hurry, a quick sauté of 2 minutes is still sufficient, but the extra time pays off in taste.
The Texture Crew
Fresh spinach is the star of the texture crew, bringing moisture, color, and a subtle earthiness that balances the richness of the cheeses. Sautéed just until wilted, it retains a slight crunch that contrasts nicely with the creamy feta. If you use frozen spinach, be sure to squeeze out excess water to avoid soggy stuffed caps.
The feta cheese provides a salty, tangy component that dissolves into the filling, creating a velvety consistency that coats each mushroom cap. The parmesan adds a nutty depth and a slight umami boost. Together, they form a harmonious blend that satisfies both the palate and the eye.
The Unexpected Star
Lemon zest is the secret ingredient that lifts the entire dish. Its bright, citrusy notes cut through the heaviness of the cheeses and add a refreshing zing that keeps the flavors from becoming cloying. If you’re allergic to citrus, a pinch of lemon juice can substitute, but the zest offers a more robust aroma.
Fresh herbs—parsley or dill—introduce a herbal brightness that echoes Mediterranean traditions. They also add a subtle crunch and a visual pop of green that enhances the dish’s appeal. If you’re experimenting, try a mix of basil and oregano for a different flavor profile.
The Final Flourish
Olive oil is essential for sautéing and for brushing the mushroom caps before baking. It adds a silky mouthfeel and helps the cheese melt evenly. Choose a good quality extra virgin olive oil for the best flavor; its peppery undertones complement the dish.
Salt and pepper are the unsung heroes that bring everything together. Season the filling to taste, and remember that the cheeses already contain salt, so be cautious not to overdo it. A pinch of freshly ground black pepper adds a subtle heat that lingers on the tongue.
Everything's prepped? Good. Let's get into the real action...
The Method — Step by Step
- Preheat your oven to 375°F (190°C). While the oven heats, rinse the portobello caps and gently pat them dry with a paper towel. Trim the stems to create a flat surface; this ensures even cooking and a stable base for the filling. I always let the caps sit in a paper towel to absorb excess moisture, which prevents them from becoming soggy during baking.
- Heat 1 tablespoon of olive oil in a large skillet over medium heat. Add the diced onion and minced garlic, sautéing until the onion turns translucent and the garlic releases its aromatic oils—about 3–4 minutes. The key is to avoid burning the garlic; if it starts to brown, lower the heat slightly.
- Add the fresh spinach to the skillet, stirring constantly until it wilts and reduces in volume. This should take about 2–3 minutes. If the spinach releases too much water, let it evaporate for an additional minute before proceeding. The spinach should be tender yet still retain a slight bite.
- Remove the skillet from heat and stir in the crumbled feta, grated parmesan, lemon zest, and chopped herbs. Mix until the cheeses melt into the spinach, creating a creamy yet cohesive filling. Taste and season with salt and pepper to your liking—remember, the cheeses are already salty, so a light hand is best.
- Brush the underside of each portobello cap with the remaining tablespoon of olive oil. This will help the caps develop a golden crust during baking and prevent them from drying out. Arrange the caps on a parchment‑lined baking sheet, gill side up.
- Fill each cap generously with the spinach–cheese mixture, pressing down gently to create an even layer. The filling should reach the top edges but not overflow—this keeps the caps neat and prevents leaks during baking.
- Bake in the preheated oven for 20–25 minutes, or until the tops are golden brown and the caps are tender. The edges will start pulling away from the filling, indicating that the dish is ready. Keep an eye on the color; if the tops brown too quickly, cover the caps loosely with foil.
- Remove from oven and let the stuffed mushrooms rest for 5 minutes. This resting period allows the filling to set slightly, making them easier to slice and serve. During this time, the flavors meld together, creating a harmonious taste experience.
That’s it— you did it. But hold on, I've got a few more tricks that'll take this to another level. Let’s dive into the finer points that elevate this dish from great to unforgettable.
Insider Tricks for Flawless Results
The Temperature Rule Nobody Follows
Many cooks bake stuffed mushrooms at too high a temperature, causing the caps to dry out and the filling to burn. I always set my oven to 375°F (190°C) and use a baking sheet lined with parchment to distribute heat evenly. This moderate temperature allows the cheeses to melt smoothly while the mushrooms soften without becoming mushy. If you’re using a convection oven, reduce the temperature by 25°F to avoid over‑browning.
Why Your Nose Knows Best
The aroma of garlic and onion sizzling is a cue that you’re on the right track. If you notice a bitter scent, the garlic is likely burning. Lower the heat or add a splash of water to deglaze the pan. A sweet, caramelized scent signals that the onions are ready to move on to the next step.
The 5‑Minute Rest That Changes Everything
Letting the stuffed mushrooms rest after baking is often overlooked, but it’s crucial for texture. During this brief pause, the filling settles, making it easier to slice cleanly. It also allows the flavors to marry, creating a more cohesive bite. I’ve seen dishes that skip this step crumble apart when you try to plate them.
The Herb Swap That Works Wonders
If parsley or dill isn’t your preference, swap in fresh basil for a sweeter note or use chopped cilantro for a bright, citrusy finish. The key is to choose herbs that complement the feta and lemon zest without overpowering them. A pinch of oregano can add a subtle Mediterranean depth that many enjoy.
The Secret to Crispy Edges
A quick drizzle of olive oil over the tops of the caps before the final 5 minutes of baking creates a crisp, golden edge that’s a delight to bite into. This simple step adds texture contrast and visual appeal. I’ve experimented with adding a light sprinkle of breadcrumbs for extra crunch—an optional twist that some diners love.
Creative Twists and Variations
This recipe is a playground. Here are some of my favorite ways to switch things up:
Mediterranean Medley
Add sun‑dried tomatoes and olives to the filling for a savory, briny twist. The tomatoes bring sweetness while the olives add depth. Serve with a side of tzatziki for a full Mediterranean experience.
Spicy Kick
Incorporate finely chopped red pepper flakes or a splash of hot sauce into the spinach mixture. The heat pairs beautifully with the feta, creating a lively contrast. Pair with a cool cucumber salad to balance the spiciness.
Cheddar & Spinach Fusion
Replace feta with sharp cheddar for a richer, sharper flavor profile. The cheddar melts into a silky coating that coats the mushroom cap. This version works well for a brunch or a hearty snack.
Pesto‑Infused Surprise
Stir in a tablespoon of basil pesto into the filling for a fragrant, herbaceous burst. The pesto adds a vibrant green color and a depth of flavor that complements the feta. This twist is perfect for a light lunch or a sophisticated appetizer.
Roasted Red Pepper Blend
Blend roasted red peppers into the spinach mixture for a smoky, sweet undertone. The peppers soften the sharpness of the feta and add a subtle smokiness. This variation is ideal for a fall gathering or a cozy dinner.
Storing and Bringing It Back to Life
Fridge Storage
Store leftover stuffed mushrooms in an airtight container in the refrigerator for up to 2 days. Keep them covered with parchment paper to preserve moisture and prevent them from drying out. When you’re ready to reheat, simply warm them in a 350°F oven for 10 minutes.
Freezer Friendly
For longer storage, freeze the assembled mushrooms (but not yet baked) in a single layer on a parchment‑lined tray. Once frozen, transfer them to a freezer bag and store for up to 2 months. To bake, place them directly in a preheated 375°F oven for 25 minutes.
Best Reheating Method
To bring them back to life, add a tiny splash of water or broth to the baking dish before reheating. This steam helps restore moisture and keeps the filling from drying. Heat at 350°F for 10–12 minutes, or until the cheese is melty and the caps are heated through.