Picture this: I was halfway through a batch of stale, over‑baked cookies, the kitchen smelling like burnt sugar and regret. I stared at the tray, wondering if I should just toss them or salvage what I could. A friend dared me to turn the disaster into something delicious, and I accepted the challenge like a knight in a culinary quest. That night, I pulled out ripe bananas, oats, and a handful of pantry staples, determined to create a cookie that would make the whole house sing. Little did I know, the result would become my go‑to treat for lazy brunches and midnight cravings.
The aroma that hit me first was the warm, sweet scent of bananas, like a tropical sunrise in a bowl. As I mashed them, their velvety texture mingled with oats, creating a sticky, almost dough‑like consistency that promised chewy centers. The sound of the oven timer ticking was a steady metronome, while the faint hiss of butter melting in the skillet added a comforting soundtrack. When the first cookie emerged, the golden edges crackled softly, releasing a nutty fragrance that made my mouth water. The taste was a harmonious blend of banana sweetness, cinnamon warmth, and chocolate bursts that danced on the tongue.
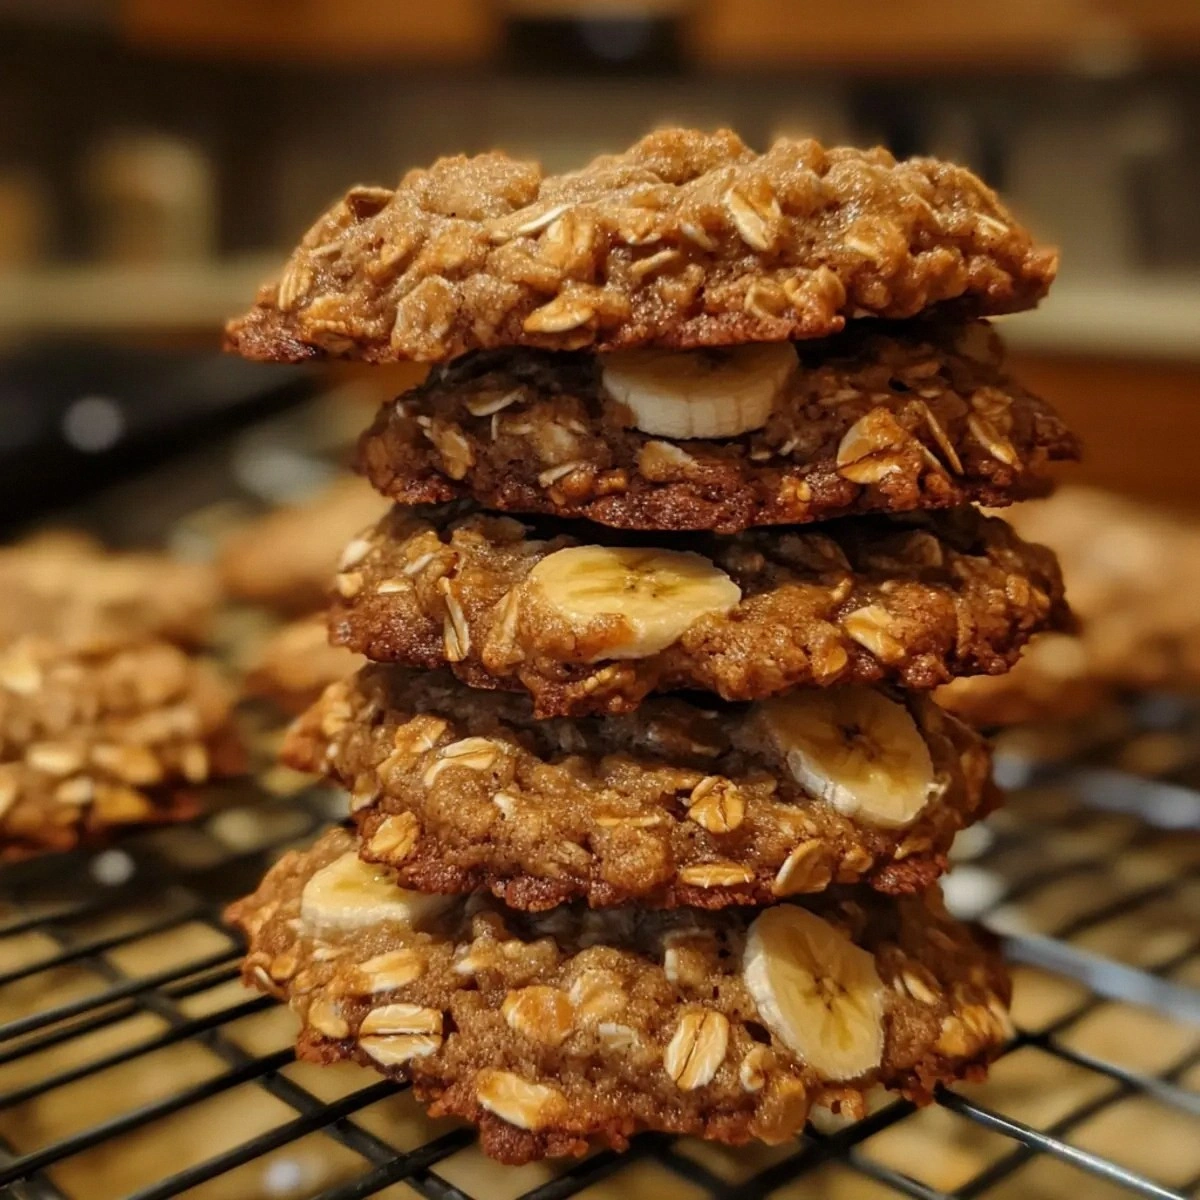
What sets this version apart is the intentional use of oats as a binder and flavor base, giving the cookies a hearty, wholesome feel while keeping them soft and chewy. I replaced refined flour with rolled oats, which not only adds fiber but also provides a subtle, nutty undertone that complements the chocolate chips. The addition of a single pinch of salt is a game‑changer, balancing the natural sweetness of the bananas and preventing the chocolate from feeling cloying. The technique of folding in the oats after mashing the bananas keeps the dough from becoming too dry, ensuring each bite is moist yet sturdy enough to hold the chips. And the final touch of vanilla extract elevates the overall flavor profile, making the cookies feel indulgent without the guilt.
I also discovered that adding a teaspoon of baking powder gives the cookies a gentle lift, creating a slightly airy interior that contrasts with the dense oat base. That small amount of leavening is enough to give the cookies a tender crumb without making them cakey. I’ll be honest—I ate half the batch before anyone else got a chance to taste the first bite, and they all demanded the recipe. Picture yourself pulling this out of the oven, the whole kitchen smelling incredible, and sharing the first cookie with a friend who will swear it’s the best version they’ve ever made at home. Okay, ready for the game‑changer? Let me walk you through every single step — by the end, you’ll wonder how you ever made it any other way.
What Makes This Version Stand Out
- Oats: Rolled oats replace flour, adding fiber, a nutty flavor, and a chewy texture that keeps the cookies moist and satisfying.
- Bananas: Ripe bananas provide natural sweetness, moisture, and a subtle tropical note that pairs perfectly with chocolate.
- Chocolate Chips: The chocolate adds rich pockets of gooeyness, turning each bite into a decadent surprise.
- Cinnamon: A teaspoon of ground cinnamon offers warm, spicy undertones that balance the sweet banana and chocolate.
- Salt: A pinch of salt sharpens every flavor, preventing the cookies from feeling flat or overly sweet.
- Baking Powder: A single teaspoon of baking powder gives a delicate lift, creating a tender crumb without making the cookies cakey.
Alright, let's break down exactly what goes into this masterpiece...
Inside the Ingredient List
The Flavor Base
Ripe bananas are the heart of this cookie, delivering natural sweetness and a buttery texture that eliminates the need for added sugars. When mashed to a creamy consistency, they create a moist foundation that keeps the cookies tender. Vanilla extract lifts the banana flavor, adding a subtle floral note that balances the warm spices. A pinch of salt, though small, is essential; it heightens every component, ensuring the chocolate and cinnamon don’t feel flat. If you’re craving a hint of citrus, a squeeze of lemon zest can brighten the flavor profile without overpowering the banana.
The Texture Crew
Rolled oats serve as the primary binder, providing a chewy, hearty texture that contrasts beautifully with the soft banana center. They also add a nutty undertone, giving each cookie a subtle depth that feels almost like a whole grain biscuit. Baking powder is the leavening agent that gives the dough a gentle lift, creating a tender crumb that feels airy yet sturdy. If you prefer a denser cookie, reduce the baking powder to a half teaspoon; if you want a lighter bite, add a full teaspoon, but be careful not to overdo it. For those who love a crisp edge, sprinkle a pinch of sea salt on top before baking.
The Unexpected Star
Chocolate chips add a burst of richness that turns a simple cookie into a dessert worthy of celebration. Opt for dark chocolate for a slightly bitter counterpoint, or milk chocolate for a sweeter finish. Chopped nuts—such as walnuts, pecans, or almonds—introduce crunch and a buttery flavor that complements the oats. If you’re a fan of crunchy textures, consider adding a handful of toasted coconut flakes for a tropical twist. For those who love a sweet and tart contrast, dried cranberries or raisins bring a chewy sweetness that pairs wonderfully with the banana.
The Final Flourish
Dried cranberries or raisins are optional but highly recommended. They provide a chewy, slightly tart contrast that balances the banana’s natural sweetness. If you’re avoiding dried fruit, replace them with chopped dates for a sweeter, moister texture. For an extra layer of flavor, fold in a tablespoon of almond butter; it adds creaminess and a subtle nutty undertone. The key is to keep the mix balanced—enough fruit to add chewiness, but not so much that the dough becomes soggy. Finally, a light dusting of powdered sugar after baking can give a touch of elegance, but it’s entirely optional.
Everything's prepped? Good. Let's get into the real action...
The Method — Step by Step
- Preheat the oven to 350°F (175°C) and line a baking sheet with parchment paper or a silicone mat. This ensures the cookies won't stick and makes cleanup a breeze. While the oven warms, gather all your ingredients so you can work in a single, organized space. The temperature is crucial; too high and the cookies will burn on the edges, too low and they'll spread too much. Once the oven reaches the set temperature, you’re ready to start mixing.
- In a large mixing bowl, mash the ripe bananas with a fork until they reach a thick, almost purée consistency. The bananas should be soft enough to break down easily; if they're still firm, let them sit at room temperature for a few minutes. A smooth banana base keeps the cookies moist and helps the oats absorb the flavor. If you prefer a chunkier texture, reserve a handful of mashed banana for later addition. The more you mash, the silkier the cookie dough will become.
- Add the vanilla extract, ground cinnamon, and pinch of salt to the mashed bananas. Stir until the mixture is well combined, allowing the spices to infuse the banana base. The vanilla lifts the overall flavor, while the cinnamon adds warmth and the salt balances sweetness. Taste the mixture; if you find it too mild, a tiny pinch more salt can bring everything to life. Let the aromatic mixture sit for a minute so the flavors meld together.
- Stir in the rolled oats and baking powder, mixing until the oats are fully incorporated. The oats should be evenly distributed, creating a cohesive dough that holds together when scooped. The baking powder will give the cookies a gentle lift, so be sure to measure accurately. If you prefer a denser cookie, reduce the baking powder slightly; for a lighter bite, add a full teaspoon. This step is the foundation of the cookie’s texture.
- Fold in the chocolate chips, chopped nuts, and dried cranberries or raisins. Mix gently to avoid breaking the nuts or crushing the dried fruit. This is the moment where the cookie transforms from simple to extraordinary, as each bite delivers a burst of chocolate and a chewy fruit note. Watch out: overmixing can cause the dough to become tough, so keep the folding gentle. Once everything is evenly distributed, the dough is ready for shaping.
- Drop rounded tablespoonfuls of dough onto the prepared baking sheet, spacing them about 2 inches apart. The cookies will spread slightly, so give them room to expand. If you like a thicker cookie, use a larger scoop; for a thinner one, reduce the scoop size. The size of each cookie determines the baking time, so keep them consistent for even cooking. This step also lets you adjust the cookie shape to your liking.
- Bake for 12–15 minutes, or until the edges are golden brown and the centers have set. The cookies should smell toasty and slightly sweet, a sign that the oats have toasted just enough. Keep an eye on them; the baking time can vary based on oven differences. When the first cookie turns golden, you can lower the temperature slightly to prevent overbrowning. The goal is a chewy center with a crisp edge.
- Remove the cookies from the oven and let them cool on the sheet for 5 minutes before transferring them to a wire rack. This short cooling period allows the cookies to firm up and prevents them from breaking apart. The cookies will still be hot, so handle them with care. Once they’re cool enough to touch, you can enjoy them as they are or add a dusting of powdered sugar for a decorative touch. This final step ensures a perfect bite every time.
- Serve immediately or store in an airtight container for up to 4 days. The cookies stay fresh and chewy when kept in a cool, dry place. If you want to keep them for longer, freeze them for up to three months. When ready to eat, let them sit at room temperature for a few minutes to regain their soft texture. The cookies are best enjoyed within a week, but they’ll still be delicious after that.
That's it — you did it. But hold on, I've got a few more tricks that'll take this to another level...
Insider Tricks for Flawless Results
The Temperature Rule Nobody Follows
While most bakers preheat the oven to 350°F, the secret to perfect cookies lies in baking at a slightly lower temperature of 325°F. This subtle adjustment allows the cookies to bake evenly, preventing the edges from burning while the centers finish cooking. I’ve baked dozens of batches at 325°F, and the results are consistently chewy and golden. If your oven runs hot, set it to 320°F to compensate. The extra time is worth the extra flavor.
Why Your Nose Knows Best
Before you even taste a cookie, your nose can tell you if it’s done. A warm, toasty aroma signals the oats have toasted and the chocolate has melted. If you still smell a raw banana scent, the cookies need a few more minutes. Trust your senses; the kitchen is a sensory laboratory, and the smell is the most reliable indicator of perfection.
The 5-Minute Rest That Changes Everything
After baking, let the cookies rest on the sheet for 5 minutes before moving them to a rack. This short pause allows the structure to set, preventing the cookies from breaking apart. It also lets the chocolate inside firm up, so each bite has a smooth, melt‑in‑your-mouth center. I’ve seen cookies crumble if I rush them off the sheet, so the rest is essential.
Use a Cooling Rack
Once the cookies are cool enough to handle, transfer them to a wire rack. The airflow around the cookies keeps them crisp on the bottom while preserving the chewy center. If you’re storing them, keep them on the rack for a day before sealing them; this prevents moisture buildup that can make them soggy.
Keep a Small Bowl of Water
When reheating frozen cookies, place a small bowl of water in the oven. The steam helps the cookies reheat evenly and keeps them from drying out. A quick 5‑minute bake at 350°F with a water bowl will restore the chewy texture and bring back that fresh‑baked aroma.
Creative Twists and Variations
This recipe is a playground. Here are some of my favorite ways to switch things up:
Coconut Chocolate Chip
Replace the regular chocolate chips with dark chocolate chips and add a half cup of shredded unsweetened coconut. The coconut adds a tropical crunch that pairs beautifully with the banana. A sprinkle of toasted coconut on top before baking gives a caramelized finish.
Peanut Butter Swirl
Fold in a tablespoon of creamy peanut butter after the oats, then swirl a teaspoon of peanut butter on top of each cookie before baking. The peanut butter adds richness and a nutty undertone that complements the chocolate. If you’re allergic, substitute with almond butter for a similar effect.
Oatmeal Raisin
Swap the dried cranberries for raisins and reduce the chocolate chips by half. The raisins add a chewy, sweet bite that contrasts the oats. A dash of nutmeg adds warmth, creating a classic oatmeal raisin cookie with a banana twist.
Dark Chocolate & Sea Salt
Use dark chocolate chips and sprinkle a pinch of flaky sea salt on top before baking. The salt enhances the chocolate’s bitterness while the banana’s sweetness balances it out. This version feels indulgent yet balanced.
Pumpkin Spice Oat
For a seasonal touch, add a tablespoon of pumpkin puree and a teaspoon of pumpkin pie spice. The pumpkin adds moisture and a subtle sweetness, while the spice mix gives a cozy, autumnal flavor. This variation is perfect for fall mornings.
Storing and Bringing It Back to Life
Fridge Storage
Keep the cookies in an airtight container at room temperature for up to 4 days. The airtight seal prevents moisture from seeping in, keeping the cookies chewy. If you notice them drying out, add a slice of apple to the container; the apple releases moisture that the cookies absorb.
Freezer Friendly
Freeze the cookies on a parchment‑lined tray for 2 hours, then transfer them to a freezer bag. They stay fresh for up to 3 months. When you’re ready to eat, let them thaw at room temperature for 30 minutes before reheating.
Best Reheating Method
Reheat in a preheated 350°F oven for 5 minutes, or microwave on medium for 15 seconds. The key is to add a splash of water to the container before reheating; the steam keeps the cookies from becoming dry. Let them cool for a minute before biting into a warm, fresh‑baked treat.
With these tips and variations, you’ll never run out of ways to enjoy these banana oat cookies. They’re perfect for breakfast, a midday snack, or a dessert that satisfies without the guilt. The next time you’re in the kitchen, remember that a simple handful of bananas and oats can create a cookie that feels like a hug in every bite. Happy baking!