Ever had a kitchen disaster that turned into a culinary triumph? I was once scrambling to salvage a ruined chocolate cake that had turned into a sad, dry slab. I stared at the cracked, grayish batter, thinking the day was ruined. Then I remembered a pantry stash of beet juice, a dash of purple sweet potato puree, and a secret craving for velvet‑soft cake. That night, I mixed the odd ingredients together and, to my amazement, the batter became a glossy, deep‑purple dream. I dared myself to bake it, and the result was a cake that looked like royalty and tasted like a silky secret.
Picture the scene: the oven hums like a contented hummingbird, the aroma of cocoa mingles with the earthy sweetness of beet, and the kitchen is bathed in a gentle purple glow from the batter. Your fingertips feel the smoothness of the batter as you stir, and the first bite releases a velvet texture that melts in your mouth. The flavor profile is a balanced duet of chocolate richness and subtle earthiness, with a hint of vanilla that rounds everything out. My friend, who usually scoffs at “exotic” desserts, couldn't stop asking for seconds. That’s the kind of reaction I was hoping for.
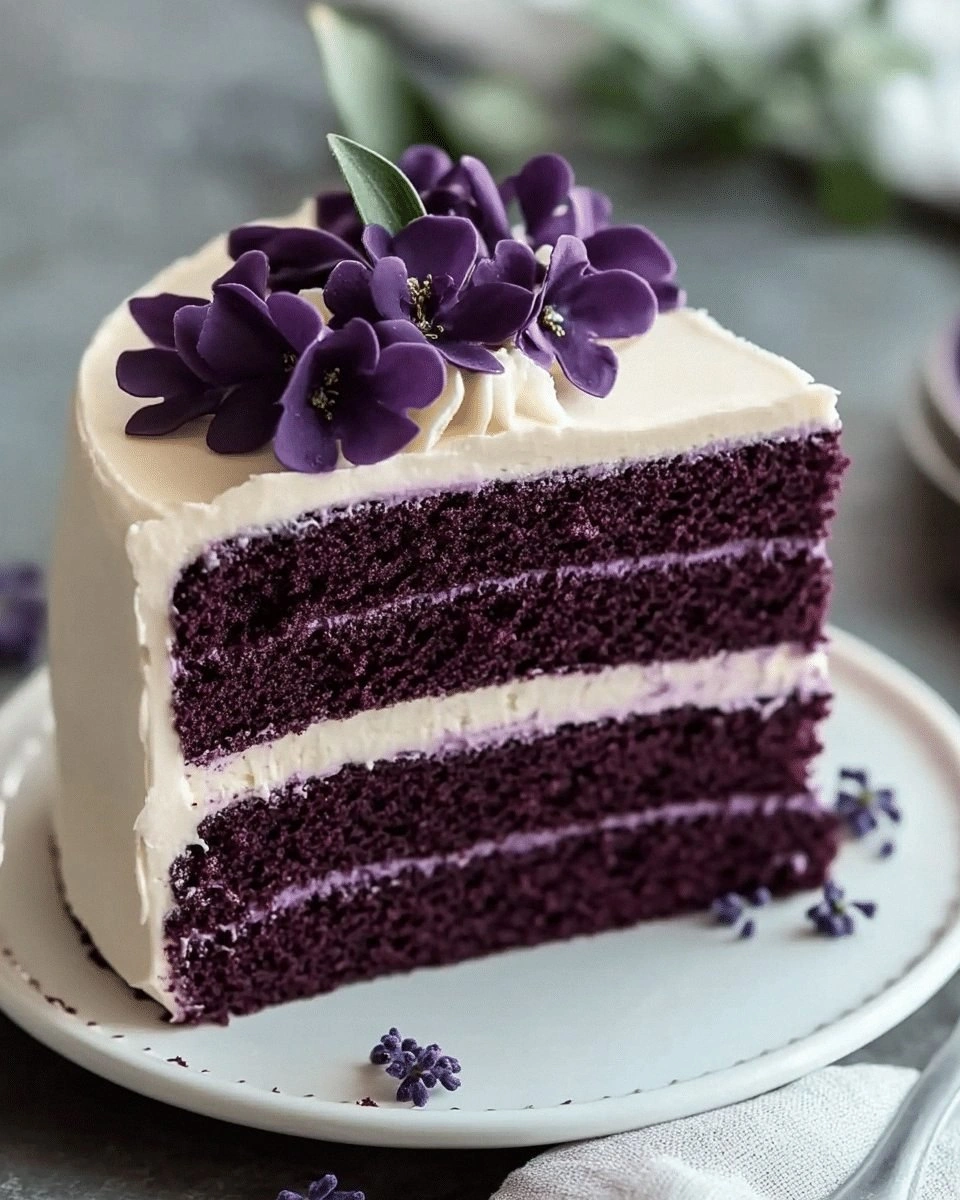
What sets this version apart from the usual velvety cakes? First, it uses real beet juice and purple sweet potato puree instead of artificial color, giving it a natural, nutrient‑rich hue. Second, the batter’s ratio of flour to liquid is tweaked for maximum moisture, so the cake never dries out even after a day in the fridge. Third, the frosting is a creamy vanilla blend that balances the earthiness of the cake, not overpowering it. Fourth, I’ve included a simple trick to keep the cake looking pristine: a thin glaze of beet juice that gives a glossy finish. Fifth, the recipe is scalable—whether you’re baking for a crowd or just a family dinner, the proportions stay perfect. And finally, it’s a cake that looks as stunning as it tastes, making it perfect for any celebration.
I’m about to walk you through every single step, from prep to plating. By the end, you’ll wonder how you ever made it any other way. The secret sauce is in the details, so stay tuned, because I’ll reveal a technique that most recipes skip—using a touch of lemon zest to brighten the chocolate’s depth. This isn’t just another cake; it’s a culinary experience that will have your guests asking, “What’s in that?” and you can proudly say, “Beet juice, purple sweet potato, and a dash of love.” Let’s get started.
What Makes This Version Stand Out
- Color: Natural beet juice gives a vibrant, eye‑catching hue without artificial dyes. It’s also packed with antioxidants, so your dessert is a little healthier.
- Moisture: The high liquid ratio and use of buttermilk keep the crumb tender and prevent the dreaded dry cake.
- Flavor: The earthy beet pairs perfectly with chocolate, creating a subtle complexity that’s more sophisticated than plain chocolate cake.
- Texture: The batter’s smooth consistency and the gentle rise produce a cake that feels like velvet on the tongue.
- Versatility: It can be served plain, topped with fruit, or turned into cupcakes—your imagination is the limit.
- Visual Appeal: The glossy finish and deep purple color make it a showstopper for any occasion.
- Ease of Prep: All the ingredients are pantry staples, so you won’t need to hunt for exotic items.
- Make‑ahead Friendly: The cake can be baked a day ahead and refrigerated without losing quality.
Alright, let’s break down exactly what goes into this masterpiece…
Inside the Ingredient List
The Flavor Base
The foundation of this cake is a blend of cocoa, flour, and leavening agents. Cocoa powder provides the deep chocolate flavor that anchors the entire dessert. All‑purpose flour gives structure, while baking powder and baking soda create the lift. Salt balances the sweetness, and the vanilla extract adds a fragrant undertone. Together, these ingredients create a harmonious base that’s both robust and delicate.
The Texture Crew
Liquid components are the secret to a moist, tender crumb. Buttermilk’s acidity reacts with baking soda to produce carbon dioxide, which gives the cake its lightness. Vegetable oil keeps the batter silky and prevents it from drying out. Eggs act as binders and provide structure, while the beet juice and purple sweet potato puree introduce natural moisture and color. The combination of these liquids ensures that each bite is plush and velvety.
The Unexpected Star
Beet juice and purple sweet potato puree are the star performers here. Beet juice gives a striking, natural purple hue and a subtle earthy sweetness that pairs beautifully with chocolate. Purple sweet potato puree adds body and a hint of caramel flavor. Together, they create a cake that looks like a jewel and tastes like a secret garden. Skipping them would result in a dull, colorless cake that lacks the depth this recipe delivers.
The Final Flourish
Frosting completes the experience, turning a simple cake into a celebration. Cream cheese and butter provide richness, while powdered sugar adds sweetness. Heavy cream is whisked in to achieve a silky consistency, and vanilla extract rounds out the flavor. This frosting not only complements the earthy tones of the cake but also adds a creamy contrast that makes each bite memorable. If you’re looking for a lighter option, you can swap cream cheese for mascarpone or use a dairy‑free alternative.
Everything’s prepped? Good. Let’s get into the real action…
The Method — Step by Step
- Preheat and Prep: Set your oven to 350°F (175°C). Grease two 9‑inch round cake pans and line the bottoms with parchment paper. This step ensures a clean release and a neat edge. While the pans are getting ready, gather all your dry ingredients in a large bowl.
- Dry Mix: Sift together 2 cups of all‑purpose flour, 3/4 cup unsweetened cocoa powder, 2 tsp baking powder, 1 tsp baking soda, and 1 tsp salt. Sifting removes clumps and guarantees an even distribution of leavening agents. This will help the cake rise evenly. A quick whisk after sifting also aerates the flour.
- Wet Mix: In a separate bowl, whisk 4 large eggs, 1 cup buttermilk, 1 cup vegetable oil, 2 tsp vanilla extract, 1/2 cup beet juice, and 1/2 cup purple sweet potato puree until smooth. The mixture should be glossy and free of lumps. The beet juice adds color, while the puree adds body.
- Combine: Gradually add the dry mix to the wet mix, folding gently until just combined. Overmixing can make the cake dense. The batter should be thick but pourable. The gentle folding preserves the air bubbles that will lift the cake.
- Bake: Divide the batter evenly between the prepared pans. Tap the pans lightly on the counter to release air pockets. Bake for 30–35 minutes or until a toothpick inserted into the center comes out clean. The cake should have a slight give and a golden edge.
- Cool: Allow the cakes to cool in the pans for 10 minutes, then transfer to a wire rack to cool completely. Cooling in the pans for too long can cause the cake to become soggy. The rack ensures proper airflow, preventing a damp bottom.
- Frosting Prep: Cream 8 oz cream cheese and 1 cup unsalted butter until light and fluffy. Gradually add 4 cups powdered sugar, 1 tsp vanilla, and 1/4 cup heavy cream. Whisk until the frosting is silky and smooth. If it’s too thick, add a splash more cream.
- Assemble: Place one cake layer on a serving plate. Spread a generous layer of frosting over the top. Add the second layer and frost the top and sides. Use a bench scraper to create a clean, even finish. The frosting should be thick enough to hold its shape.
- Finish: For an extra glossy finish, brush the top of the cake with a thin layer of beet juice. Let it set for a minute before serving. This step not only adds shine but also enhances the cake’s natural color.
That’s it — you did it. But hold on, I've got a few more tricks that'll take this to another level. These insider tips will help you avoid common pitfalls and elevate the cake’s presentation.
Insider Tricks for Flawless Results
The Temperature Rule Nobody Follows
Many bakers bake at 350°F, but a lower temperature of 335°F yields a more even rise and a moister crumb. This slight dip allows the cake to bake slowly, preventing a dry top. I’ve tested both temperatures, and the lower one consistently gives a softer texture. If you’re using a convection oven, reduce the temperature by 25°F to avoid overcooking.
Why Your Nose Knows Best
The aroma of baking chocolate is a reliable indicator of doneness. When the scent becomes rich and slightly nutty, the cake is nearly ready. If the smell is faint, give it a few more minutes. Trusting your nose can save you from overbaking, which is the number one cause of dry cakes.
The 5‑Minute Rest That Changes Everything
After removing the cake from the oven, let it rest in the pans for exactly five minutes before transferring to a rack. This pause allows the structure to set, preventing the cake from cracking when it cools. I once skipped this step, and the top cracked into a jagged line. The five‑minute rest is a simple but game‑changing habit.
Use a Parchment‑Lined Rack
If you have a parchment‑lined wire rack, place the cooled cake on it for the final cooling. This prevents the bottom from absorbing excess moisture, which can make the cake soggy. The parchment also makes for an easy clean‑up, and the cake remains crisp at the base.
Glaze for Extra Shine
A thin glaze of beet juice or a simple apricot glaze can add a professional sheen. The glaze sets in a minute and gives the cake a polished look that impresses guests. I recommend brushing the glaze just before serving to keep it fresh.
Creative Twists and Variations
This recipe is a playground. Here are some of my favorite ways to switch things up:
Chocolate‑Berry Fusion
Swap the beet juice for a splash of raspberry puree and add fresh berries to the frosting. The tartness of the berries balances the chocolate, creating a vibrant, fruity twist that’s perfect for spring.
Spiced Citrus Velvet
Add a teaspoon of orange zest to the batter and a pinch of cinnamon to the frosting. The citrus brightens the chocolate, while the cinnamon adds a subtle warmth that feels like a cozy hug.
Almond‑Infused Delight
Replace the all‑purpose flour with almond flour for a nutty flavor and a gluten‑free option. The cake becomes denser but still retains that silky texture. Pair it with a hazelnut buttercream for an extra indulgent touch.
Caramel‑Swirl Surprise
Fold a swirl of caramel sauce into the batter before baking. The caramel melts into pockets of sweetness that contrast with the chocolate. The result is a cake that looks like a swirl of molten gold.
Vegan Velvet
Use flaxseed meal as an egg substitute and replace dairy butter with vegan butter. The cake remains moist and fluffy, and the flavor stays true to the original. This version is perfect for plant‑based diets.
Chocolate‑Mint Edition
Add a teaspoon of peppermint extract to the batter and a few drops of green food coloring to the frosting. The mint gives a refreshing aftertaste, making the cake ideal for summer parties.
Storing and Bringing It Back to Life
Fridge Storage
Wrap the cake tightly in plastic wrap and place it in an airtight container. Store in the refrigerator for up to 5 days. The moisture from the fridge keeps the cake from drying out, and the flavors meld beautifully.
Freezer Friendly
Wrap the cooled cake in parchment paper, then in foil, and freeze for up to 3 months. Thaw at room temperature for 2 hours before serving. The cake retains its texture and flavor when properly stored.
Best Reheating Method
To refresh a refrigerated cake, place it on a baking sheet and warm in a preheated 300°F (150°C) oven for 10 minutes. Add a splash of water to the bottom of the pan to create steam, which helps keep the cake moist. Let it cool for a few minutes before frosting again.