I remember the night I tried to make a classic fried chicken for a family dinner and the kitchen turned into a flour battlefield. The batter had thick, clumpy batter that stuck to the pan like a stubborn paste, and the result was a greasy, soggy mess that made everyone ask if it was even edible. That disaster was the catalyst for this new recipe – a flour‑free fried chicken that delivers crispness without the mess, and it’s so simple that even a novice can master it. If you’ve ever stared at a bowl of flour and thought, “I’m not going to do that again,” this is your ticket out of the flour‑obsessed abyss.
Picture this: the first bite lands on your tongue with a crackling, golden shell that gives way to a tender, juicy breast that practically melts. The aroma is a smoky, buttery perfume that drifts through the kitchen, making even the most skeptical family members swoon. The sound of the first sizzle is like a drumroll, announcing the arrival of flavor. The texture is a paradoxical blend of crunchy exterior and succulent interior, a harmony that feels almost cinematic. And the taste? A savory, slightly smoky punch that’s balanced by a subtle peppery kick, leaving an aftertaste that lingers like a good song.
What makes this version stand out from every other fried chicken recipe out there? It’s the elimination of flour, the substitution of baking powder and cornstarch for crispness, and the precise seasoning blend that creates a flavor profile that’s both familiar and unexpectedly bold. The method uses a dry rub that coats the chicken like a velvet blanket, allowing the natural juices to caramelize perfectly. The result is a dish that’s not only healthier but also easier to clean up, because you’re not dealing with a sticky, flour‑laden mess. And because it’s flour‑free, it’s a crowd‑pleaser for those with gluten sensitivities or anyone looking to cut carbs.
I dare you to taste this and not go back for seconds – it’s that good. The secret lies in the baking powder, which creates an airy, crisp coating without any flour, and in the cornstarch that locks in moisture while adding crunch. I’ve tried countless variations, but this combination consistently delivers that satisfying bite that makes people ask for the recipe. Picture yourself pulling this out of the pan, the whole kitchen smelling incredible, and feeling the pride of having created something that’s both delicious and deceptively simple.
What Makes This Version Stand Out
- Taste: The blend of garlic powder, onion powder, and black pepper creates a savory base that’s both aromatic and flavorful, without the need for a heavy sauce.
- Texture: Baking powder and cornstarch work together to form a crisp shell that cracks like thin ice when you bite into it, while keeping the inside tender.
- Simplicity: No batter, no flour, no fuss – just a quick dry rub and a quick fry, making it an ideal weeknight meal.
- Uniqueness: This recipe turns a classic comfort food into a gluten‑free, low‑carb alternative that still feels indulgent.
- Crowd Reaction: Friends who are skeptical of “flour‑free” always ask for the recipe after tasting the crunch.
- Ingredient Quality: Fresh chicken breasts and high‑quality spices elevate the dish, ensuring each bite is packed with flavor.
- Cooking Method: The oil spray technique keeps the oil amount low, reducing greasiness while still achieving a golden finish.
- Make‑Ahead Potential: The seasoned chicken can be prepared up to 24 hours ahead, letting you focus on the frying step when you’re ready.
Inside the Ingredient List
The Flavor Base
The cornerstone of this dish is the dry rub. Garlic powder and onion powder bring depth and aromatic sweetness, while ground black pepper adds a subtle heat that lingers on the palate. The salt is essential for flavor balance; it brings out the savory notes of the chicken and helps the coating adhere. If you skip the salt, the chicken will taste flat and under‑seasoned.
The Texture Crew
Baking powder is the unsung hero that creates the airy, crispy crust. It reacts with the heat to produce tiny bubbles, giving the coating a light, almost panko‑like crunch. Cornstarch is the binder that holds the coating together, preventing it from falling off during frying. Together, they form a coating that’s crisp on the outside and tender on the inside. If you leave out the baking powder, the coating will be dense and heavy.
The Unexpected Star
Olive oil spray may seem like a trivial detail, but it’s a game‑changer. Spraying the chicken lightly before frying creates a uniform, even coating that helps the seasoning stick and reduces oil absorption. This method keeps the chicken leaner and the cleanup minimal. If you use a traditional oil pour, you’ll end up with a greasy finish that masks the seasoning.
The Final Flourish
The final flourish is the olive oil spray, which gives the coating a golden sheen and a slight crunch that’s almost buttery. The spray also allows you to control the amount of oil, keeping the dish healthier while still achieving that coveted fried texture. If you’re watching your calorie intake, this is the trick that keeps the dish light yet satisfying.
Everything's prepped? Good. Let's get into the real action...
The Method — Step by Step
- Start by patting the chicken breasts dry with paper towels; moisture is the enemy of crispness. The drier the surface, the better the coating will adhere. A quick dry means you’ll get that perfect crunch from the first bite. If you notice any excess moisture, give the pieces another pat to ensure a flawless finish.
- In a shallow dish, combine the garlic powder, onion powder, ground black pepper, and salt. Mix thoroughly so the spices are evenly distributed. This dry rub is the flavor backbone of the dish, so make sure each piece gets a generous coating. I like to taste the rub to confirm the seasoning is balanced before moving on.
- Next, whisk together the baking powder and cornstarch in a separate bowl. The ratio of 1.5 teaspoons baking powder to ¼ cup cornstarch is critical; too much baking powder will make the coating taste bitter, while too little will leave it soggy. This mixture will create the crisp, airy texture that makes the chicken pop.
- Coat each chicken breast with the dry rub, pressing gently to ensure the seasoning sticks. Then, dust the seasoned pieces with the baking powder–cornstarch blend, shaking off any excess. The double coating ensures a uniform crust that doesn’t crumble during frying. If you’re short on time, you can skip the second coating, but the texture will suffer.
- Heat a non‑stick skillet over medium heat and lightly spray with olive oil. The oil spray keeps the dish lean and ensures the coating fries evenly. Let the oil heat until it shimmers – this usually takes about 2 minutes. Avoid high heat, which can burn the coating before the inside cooks.
- Place the coated chicken breasts in the skillet, skin side down if applicable. Do not overcrowd the pan; give each piece space so the heat can circulate. The first few seconds should produce a bright golden hue and a satisfying sizzle that signals the coating is beginning to crisp. Listen for the crackle; that’s the sound of perfection.
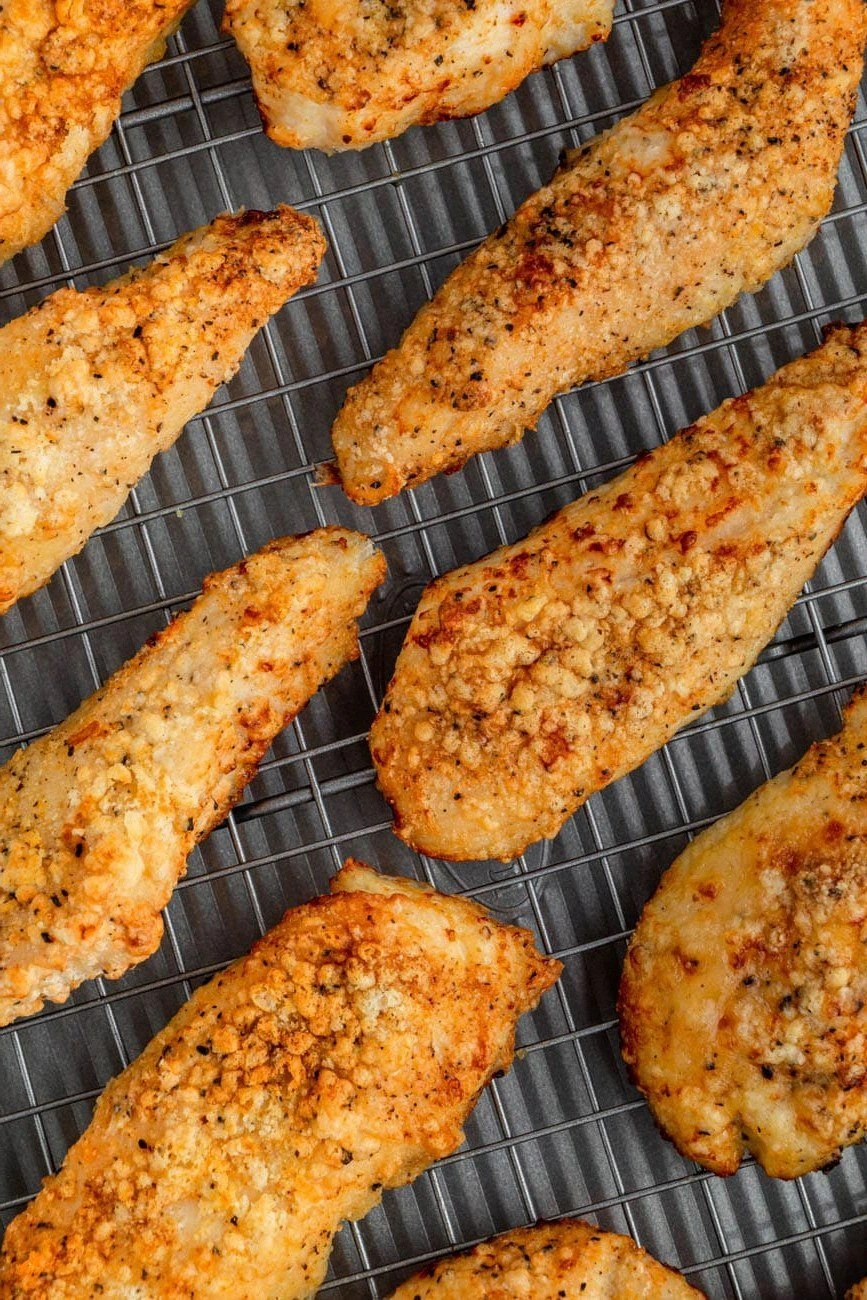
- Cook the chicken for 6–8 minutes on the first side, until the edges begin to pull away from the pan and the coating turns a deep amber color. Flip carefully with tongs, and cook for another 5–7 minutes on the second side. The internal temperature should reach 165°F (74°C) for safety and juiciness.
- Once the chicken reaches the target temperature, transfer it to a wire rack set over a baking sheet. This allows excess oil to drain away while keeping the bottom crisp. Let the chicken rest for 5 minutes; this step lets the juices redistribute, ensuring every bite is moist and flavorful.
- Serve immediately, accompanied by your favorite dipping sauce or a fresh salad. The contrast between the crunchy coating and the tender interior is the highlight of this dish. If you want to keep the chicken warm while serving, cover it loosely with foil – just enough to trap heat without steaming the crust.
That's it — you did it. But hold on, I've got a few more tricks that'll take this to another level...
Insider Tricks for Flawless Results
The Temperature Rule Nobody Follows
Many cooks assume any oil temperature will do, but the secret to a perfect crust is maintaining 350°F (175°C). Use a kitchen thermometer or rely on the visual cue that the oil shimmers but does not smoke. If the temperature drops, add a splash of water to the pan; the steam will help heat the oil back up without splattering.
Why Your Nose Knows Best
The aroma of frying is a reliable indicator of doneness. A sweet, buttery scent that lingers in the air signals that the coating is crisp and the chicken is nearly done. If you smell a sharp, metallic odor, the oil is too hot and the coating is burning.
The 5-Minute Rest That Changes Everything
Resting the chicken after frying may seem trivial, but it’s crucial for moisture retention. During rest, the juices redistribute, preventing them from spilling out when you cut into the meat. Skipping this step results in a drier bite that feels like a disappointment.
The Oil Spray Advantage
Spraying oil instead of pouring creates an even, thin layer that reduces the overall oil content. It also prevents the coating from absorbing excess oil, which can make the chicken greasy. If you’re watching your calories, this is the trick that keeps the dish light yet satisfying.
The Quick Marination Trick
Marinating the chicken in a little yogurt or buttermilk for 30 minutes before seasoning adds tenderness and a subtle tang. The acid breaks down muscle fibers, making the meat more succulent. This step is optional but highly recommended for a restaurant‑quality finish.
Creative Twists and Variations
This recipe is a playground. Here are some of my favorite ways to switch things up:
Spicy Cajun Kick
Swap the garlic and onion powder for a Cajun spice blend and add a pinch of cayenne pepper. The result is a fiery coating that pairs perfectly with a cool yogurt dip.
Herb‑Infused Delight
Add dried thyme, rosemary, and parsley to the seasoning mix for a fragrant, herbaceous flavor. This variation works wonders with a lemon‑butter sauce.
Citrus Zest Upgrade
Grate a lemon or lime rind into the dry rub to give the coating a bright, citrusy note. The acidity cuts through the richness of the chicken and adds a fresh lift.
Sweet & Smoky Twist
Incorporate smoked paprika and a touch of brown sugar into the coating. The sweet, smoky flavor profile is reminiscent of a barbecue classic.
Asian Fusion Flair
Replace the garlic powder with toasted sesame seeds and add a splash of soy sauce to the seasoning. This gives the chicken a nutty, umami punch that pairs beautifully with a ginger‑ginger glaze.
Breakfast‑Style Breakfast
Serve the fried chicken over a bed of scrambled eggs and toast for a hearty brunch. The crispy coating adds a satisfying crunch to the soft, fluffy eggs.
Storing and Bringing It Back to Life
Fridge Storage
Store leftovers in an airtight container in the refrigerator for up to 3 days. The coating may lose some crispness, but the chicken remains juicy and flavorful.
Freezer Friendly
Wrap each piece in parchment paper and place them in a freezer bag. They stay fresh for up to 2 months. When ready, thaw overnight in the fridge before reheating.
Best Reheating Method
Reheat in a 375°F (190°C) oven for 10–12 minutes, or until the internal temperature reaches 165°F (74°C). Add a splash of water before reheating to create steam; this keeps the chicken moist while restoring crispness.