Picture this: you’re halfway through a long week, the fridge is a bland gray, and you hear that faint, irresistible whiff of chocolate drifting from the back of the pantry. You pull out a box of cocoa, a bag of sugar, and a block of cream cheese, and suddenly the kitchen transforms into a playground of possibilities. That moment is the spark that ignited my obsession with the ultimate chocolate‑cheesecake hybrid, a dessert that marries the deep, bittersweet kiss of dark chocolate with the silky, tangy embrace of cheesecake. I dared myself to craft something that would not only satisfy a midnight craving but also turn heads at the next dinner party.
I’ve always been the type who loves a good challenge, but I’ve also learned that the best recipes are the ones that feel like a secret handshake between you and your taste buds. I remember the first time I tried a cheesecake brownie and it was a disaster: the cake was too dense, the frosting too runny, and the whole thing felt like a sad compromise. Fast forward to today, and this version is a symphony of textures—crisp edges that crack like thin ice, a fudgy core that melts on the tongue, and a creamy top that whispers “yes, please” with every bite. The aroma alone is a promise of comfort, and the sight of that glossy finish makes you think you’re looking at a piece of art.
What makes this recipe stand out is not just the combination of flavors, but the precision in technique that turns a simple batter into a decadent masterpiece. I’ve distilled years of kitchen experiments into a streamlined process that keeps the batter from drying out, the filling from separating, and the final product from being a mess. The result? A brownie that’s moist to the core, with a cheesecake layer that’s smooth and luscious—without any extra effort or fancy equipment. And trust me, when you taste the first bite, you’ll feel that I dare you to taste this and not go back for seconds.
Let me walk you through every single step—by the end, you’ll wonder how you ever made it any other way. From the first swirl of butter to the final slide of the cooling rack, each motion is a step toward a dessert that’s hands down the best version you’ll ever make at home. Picture yourself pulling this out of the oven, the whole kitchen smelling incredible, and the moment you cut into it, the chocolate aroma mingles with the faint tang of cream cheese, creating a scent that makes your mouth water in anticipation. Stay with me here—this is worth it.
What Makes This Version Stand Out
- Flavor: The dual layers of chocolate and cheesecake create a dynamic taste profile that balances sweetness with a subtle tang, ensuring each bite is complex yet comforting.
- Texture: The brownie base is fudgy and dense, while the cheesecake topping is silky and airy—this contrast makes every forkful a delightful experience.
- Simplicity: No fancy equipment, no time‑consuming steps, just a few ingredients and a single pan, making it ideal for both novices and seasoned bakers.
- Uniqueness: The seamless blend of two classic desserts in one bite is rare, and it sets this recipe apart from the countless chocolate or cheesecake options out there.
- Crowd Reaction: Friends and family always ask for the recipe after the first batch—this dessert is a guaranteed show‑stopper at gatherings.
- Ingredient Quality: Using high‑quality butter, fresh eggs, and cream cheese gives depth of flavor that you can’t achieve with low‑grade substitutes.
Inside the Ingredient List
The Flavor Base
The butter, sugar, eggs, vanilla, cocoa, flour, and salt form the heart of the brownie. Butter brings richness and moisture, while the sugar creates a caramelized crust. Cocoa provides the deep, bittersweet flavor that is the soul of any chocolate dessert. The flour keeps the batter from becoming too liquid, and the salt balances the sweetness, preventing the chocolate from tasting flat.
The Texture Crew
Eggs act as binders, giving structure to the brownie and ensuring it rises just enough to stay dense yet tender. The flour’s protein content forms a network that holds the batter together, while the cocoa’s fat content contributes to a fudgy mouthfeel. If you skip the flour, you’ll end up with a gooey mess that won’t hold its shape.
The Unexpected Star
Cream cheese is the secret weapon that turns a brownie into a cheesecake brownie. It adds a tangy counterpoint to the chocolate, preventing the dessert from feeling overly sweet. The fat content of the cream cheese also lends a silky texture that melts in your mouth. If you can’t find cream cheese, a thick Greek yogurt can mimic the tang, but the result will be less rich.
The Final Flourish
The second set of sugar, egg, and vanilla in the filling layer are crucial for achieving that classic cheesecake consistency. The sugar dissolves into the cream cheese, creating a smooth batter, while the egg binds the mixture and ensures it sets properly. Vanilla adds a subtle warmth that ties the two layers together. Skipping these will leave you with a thin, under‑cooked layer that doesn’t hold its shape.
Everything’s prepped? Good. Let’s get into the real action and bring this dessert to life.
The Method — Step by Step
- Preheat your oven to 350°F (175°C). Grease an 8‑inch square pan with butter or line it with parchment paper for easy removal. Let the pan sit at room temperature while you mix the batter—this helps the chocolate melt evenly.
- In a medium bowl, melt the butter over low heat until it’s silky and golden. Add the ¾ cup sugar and stir until the mixture is glossy. This is the moment the kitchen starts smelling like a chocolate factory.
- Whisk in the 2 eggs one at a time, ensuring each is fully incorporated before adding the next. Then fold in the vanilla extract. The batter should look smooth, almost like a thick custard.
- Sift the ⅓ cup cocoa powder, ½ cup flour, and ¼ teaspoon salt into a separate bowl. Gently fold this dry mix into the wet batter until just combined. Overmixing can make the brownies tough.
- Pour the brownie batter into the prepared pan, smoothing the top with a spatula. Spread it evenly to create an even base for the cheesecake layer.
- In a separate bowl, beat the softened cream cheese until it’s fluffy. Add ¼ cup sugar and beat until the mixture is light and airy. Then whisk in the egg and ½ teaspoon vanilla, ensuring a smooth, lump‑free batter.
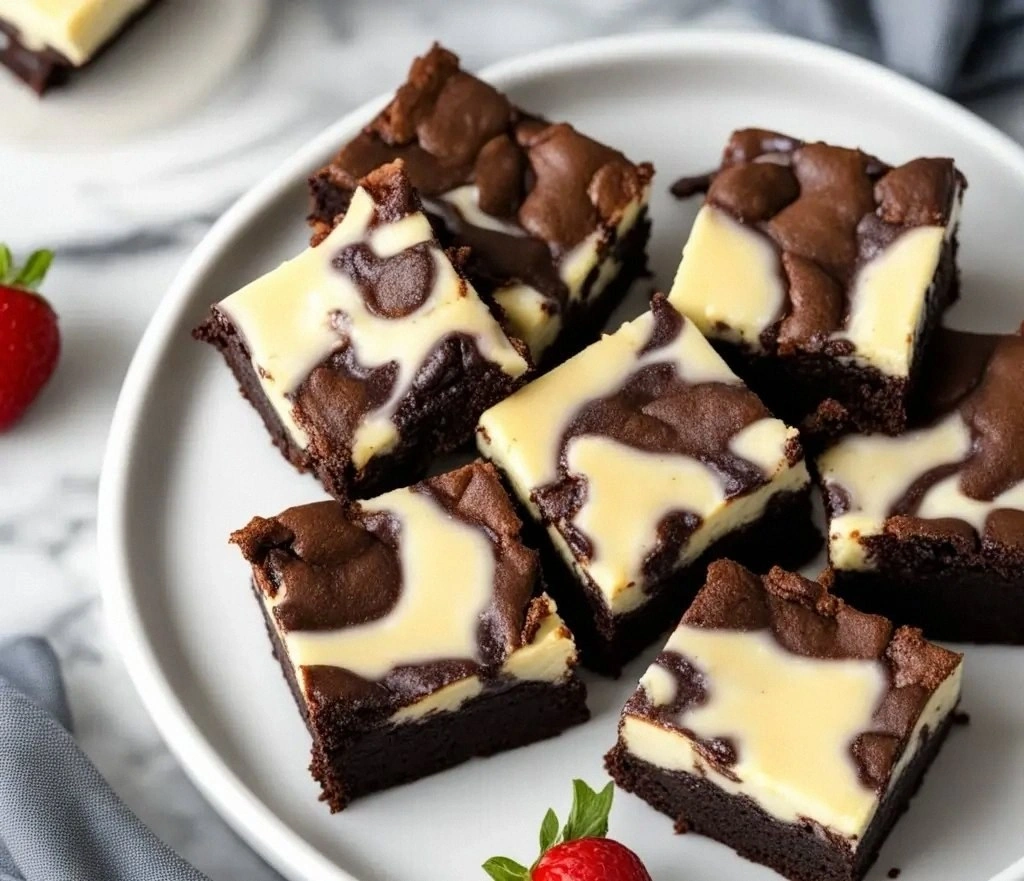
- Carefully pour the cheesecake batter over the brownie base, gently swirling with a knife to create a marbled effect. The swirl should look like a chocolate river flowing through a creamy landscape.
- Bake for 30 minutes, or until the edges are set and the center still has a slight jiggle. Remove from the oven and let the brownies cool in the pan on a wire rack for 15 minutes before slicing. The result is a decadent, multi‑layered dessert that’s both visually stunning and irresistibly flavorful.
That’s it—you did it. But hold on, I’ve got a few more tricks that will take this to another level and keep your brownies looking and tasting flawless every time.
Insider Tricks for Flawless Results
The Temperature Rule Nobody Follows
Oven temperatures can vary wildly, so always preheat for at least 10 minutes and use an oven thermometer. A 10‑degree fluctuation can mean the difference between a perfect rise and a collapsed center. If your brownies look too dark, lower the temperature by 10°F and bake a few minutes longer.
Why Your Nose Knows Best
As the brownies bake, the aroma will change from sweet to slightly nutty. When the scent is deep chocolatey, the brownies are almost ready. Trust your nose—if it’s still smelling like raw sugar, give them a few more minutes.
The 5‑Minute Rest That Changes Everything
After baking, let the brownies sit in the pan for exactly five minutes before transferring to a wire rack. This short rest allows the cheesecake layer to set slightly, reducing the risk of cracks when you slice. It also gives the flavors a chance to meld, enhancing the overall taste.
Mixing Order Matters
When combining wet and dry ingredients, always add the dry mix to the wet in small batches, folding gently each time. This technique prevents overworking the batter, which can lead to a tough crumb. A light hand keeps the brownies tender.
Cooling Rack Trick
Place the cooling rack on a flat surface and let the brownies rest for 15 minutes. This prevents condensation from forming on the bottom, which can make the brownies soggy. The rack also keeps them from sticking to the pan.
The Final Touch
After the brownies cool, drizzle a thin layer of dark chocolate over the top for an extra wow factor. The chocolate should melt slightly into the cheesecake layer, creating a glossy finish that’s as delicious as it is beautiful.
Creative Twists and Variations
This recipe is a playground. Here are some of my favorite ways to switch things up:
Nutty Delight
Add ½ cup chopped walnuts or pecans to the brownie batter before baking. The crunch provides a delightful contrast to the creamy cheesecake layer. Walnuts also add a subtle earthy flavor that pairs beautifully with chocolate.
Espresso Infusion
Stir 1 tablespoon of instant espresso powder into the cocoa mix. The espresso deepens the chocolate flavor without adding liquid, giving the brownies a sophisticated coffee kick that’s perfect for brunch.
Sea Salt Finish
Sprinkle a pinch of Maldon sea salt on top of the brownies before baking. The salt caramelizes slightly, adding a savory edge that balances the sweetness and enhances the chocolate notes.
Caramel Swirl
Swirl in ¼ cup of caramel sauce into the cheesecake batter before pouring it over the brownies. The caramel adds a buttery sweetness that complements the dense chocolate base and creates a stunning visual pattern.
Minty Twist
Fold 1 teaspoon of fresh mint extract into the cheesecake batter. The mint offers a refreshing contrast to the rich chocolate, making the dessert feel lighter and more refreshing.
Dark Chocolate Ganache
After the brownies cool, top them with a glossy dark chocolate ganache. This adds a silky layer that coats the brownie like velvet and intensifies the chocolate experience.
Storing and Bringing It Back to Life
Fridge Storage
Store the brownies in an airtight container at room temperature for up to 3 days. If you prefer a firmer bite, keep them in the refrigerator for up to a week. The airtight seal prevents the brownies from drying out.
Freezer Friendly
Wrap each brownie individually in plastic wrap, then place them in a freezer bag. They’ll stay fresh for up to 3 months. When ready to eat, let them thaw at room temperature for 30 minutes.
Best Reheating Method
Reheat in a preheated oven at 300°F (150°C) for 8–10 minutes. If you’re short on time, microwave on low for 15–20 seconds per slice. Add a tiny splash of water before reheating; it steams the brownies back to a moist, fresh texture.