I was halfway through a frantic week of meetings, deadlines, and a fridge that looked like a barren desert when my roommate dared me to create something that would make us forget about the looming tax forms. I tossed a half‑eaten bag of graham crackers into the trash, only to hear that unmistakable “crunch” of a perfect crust forming in my mind. The craving for something tangy, sweet, and utterly Instagram‑worthy hit me like a summer thunderstorm, and I knew I needed a dessert that could be assembled in a flash, eaten with a spoon, and still feel like a fancy restaurant treat. That night, I stared at a lone key lime and thought, “What if I could bottle that citrus sunshine into a jar and skip the oven entirely?”
The kitchen filled with the bright, almost electric scent of lime zest hitting the warm cream cheese, while the buttery crust whispered promises of buttery crunch. I could hear the faint pop of the jar lids as I sealed each masterpiece, and the cool glass against my fingertips felt like holding a tiny, edible lighthouse. When I finally tasted the first spoonful, the silky tang of lime danced with the sweet, velvety cream cheese, and the crumbly crust provided a satisfying contrast that made my taste buds throw a tiny parade. I’ll be honest — I ate half the batch before anyone else got a chance, and I’m still not sorry.
What sets this version apart from every other key lime cheesecake you’ve ever seen is the secret weapon: a splash of sweetened condensed milk that turns the filling into a cloud‑like mousse without any baking. Most recipes get this completely wrong, ending up heavy, grainy, or worse, soggy. This one stays firm enough to hold its shape in a jar, yet melts in your mouth like a tropical breeze. I dare you to taste this and not go back for seconds; the balance of tart and sweet is hands down the best version you’ll ever make at home.
Let me walk you through every single step — by the end, you’ll wonder how you ever made it any other way. Okay, ready for the game‑changer? This next part? Pure magic. Stay with me here — this is worth it.
What Makes This Version Stand Out
- Taste: The key lime juice is bright and authentic, balanced perfectly by the creamy sweetness of condensed milk, creating a flavor symphony that sings on the palate.
- Texture: A velvety, mousse‑like filling that holds its shape yet melts like butter on a hot biscuit, contrasted with a buttery, crumbly crust that adds a satisfying crunch.
- Simplicity: No oven, no fancy equipment, just a few pantry staples and a handful of minutes of hands‑on time — perfect for busy weeknights or spontaneous gatherings.
- Uniqueness: The use of sweetened condensed milk as a stabilizer is a secret that keeps the cheesecake light, airy, and incredibly glossy.
- Crowd Reaction: Guests rave, “Is this really no‑bake?” and immediately ask for the recipe, turning any casual get‑together into a celebration.
- Ingredient Quality: Fresh key lime juice (or the best lime you can find) provides a genuine citrus punch that bottled juice can’t match.
- Cooking Method: The no‑bake technique preserves the bright lime flavor and prevents the dreaded “cooked” cheesecake taste.
- Make‑Ahead Potential: These jars can sit in the fridge for up to three days, making them perfect for meal‑prepping or party prep.
Inside the Ingredient List
The Flavor Base
The star of this dish is the key lime juice, which brings a sharp, aromatic tang that cuts through the richness of the cream cheese. Freshly squeezed juice delivers bright citrus notes that bottled versions simply can’t replicate. If you skip the fresh juice, the entire flavor profile dulls, leaving you with a bland, one‑dimensional dessert. For a subtle twist, you can add a splash of orange zest to deepen the citrus complexity without overpowering the lime.
The Texture Crew
Cream cheese provides the luxurious body, while sweetened condensed milk acts as a sweetener and stabilizer, ensuring the filling stays smooth and glossy. The combination creates a mousse‑like texture that’s light enough to eat with a spoon yet firm enough to hold its shape in a jar. If you’re looking for a lower‑fat option, substitute half the cream cheese with Greek yogurt, but expect a slightly tangier finish.
The Unexpected Star
Unsalted butter, melted and blended with graham cracker crumbs, forms the buttery crust that anchors the entire dessert. The butter’s richness is essential; using margarine will introduce a metallic aftertaste and a crumbly texture that won’t hold up. For a gluten‑free version, swap graham crackers for crushed gluten‑free cookies, but keep the butter ratio the same to maintain that perfect crunch.
The Final Flourish
A pinch of salt and a dash of vanilla extract are the subtle backstage crew that elevate every bite. Salt amplifies the citrus zing, while vanilla adds a warm, sweet undertone that rounds out the flavor. Skipping these tiny additions can make the dessert taste flat, as if the lime is shouting without any harmony. Always taste the filling before pouring it into the jars; a tiny adjustment can make a world of difference.
Everything's prepped? Good. Let's get into the real action...
The Method — Step by Step
Start by crushing the graham crackers into fine crumbs; a food processor works best, but a sealed bag and rolling pin will do. Transfer the crumbs to a mixing bowl, then add the melted butter and granulated sugar. Stir until the mixture resembles wet sand, then press it firmly into the bottom of each mason jar, creating an even layer about a half‑inch thick. This is the foundation that will hold up the creamy filling, so don’t be shy with the pressure.
Kitchen Hack: Use the back of a spoon to smooth the crust, then refrigerate for 10 minutes to set before adding the filling.While the crust chills, soften the cream cheese in a large bowl; a few seconds in the microwave (10‑15 seconds) will make this step painless. Beat the cream cheese until it’s smooth and free of lumps, then gradually whisk in the sweetened condensed milk. The mixture will become glossy and thick, a sign that the proteins are fully incorporated and ready to hold the lime’s acidity.
Now comes the citrus punch: pour the fresh key lime juice into the cream cheese mixture, followed by the lime zest and vanilla extract. Stir gently but continuously; you’ll notice the filling turning a pale, buttery yellow, and the aroma will become intoxicatingly fresh. This is the moment of truth — if the lime is too sharp, add a splash more condensed milk; if it’s too sweet, a few extra drops of lime will bring it back into balance.
Watch Out: Over‑mixing can incorporate too much air, causing the filling to become too light and collapse when chilled.Give the mixture a quick taste and adjust the seasoning with a pinch of salt; this tiny addition will amplify the lime’s brightness. Once satisfied, spoon the creamy filling over the chilled crust, filling each jar to within a half‑inch of the rim. The smooth surface should be level, creating a perfect canvas for any topping you choose later.
Cover each jar with its lid and place them in the refrigerator for at least 2 hours, but preferably 4. This chilling period allows the filling to set, the flavors to meld, and the crust to firm up, delivering that coveted “no‑bake cheesecake” texture.
While the jars are chilling, whip a half‑cup of heavy cream with a pinch of sugar until soft peaks form. This airy topping will add a luxurious finish and a visual contrast to the bright green filling.
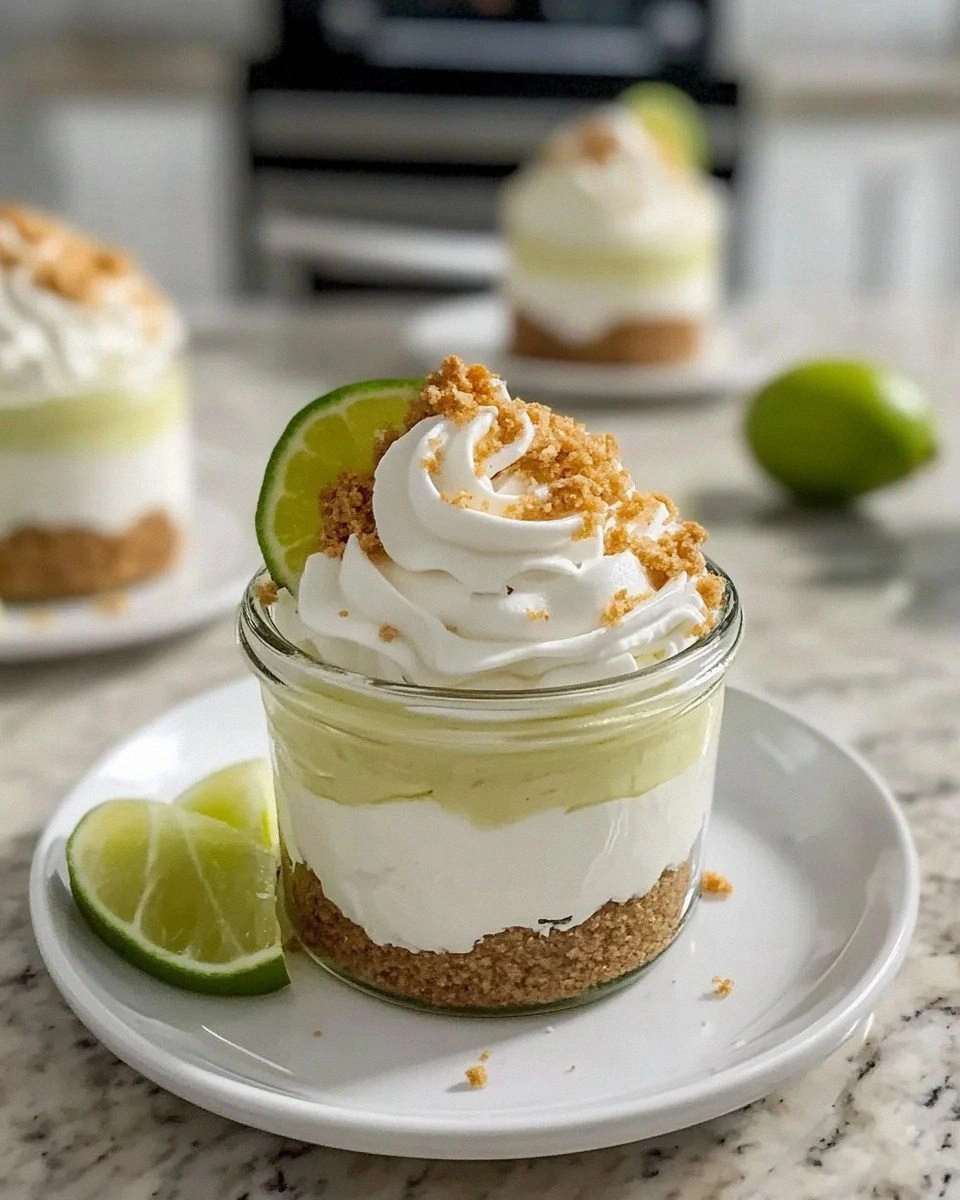
When you’re ready to serve, remove the lids, dollop a generous spoonful of whipped cream onto each cheesecake, and garnish with a thin slice of lime or a few mint leaves. The final look should be bright, inviting, and ready for that perfect Instagram snap.
Kitchen Hack: For an extra pop of color, zest a little lime over the whipped cream just before serving.Give each jar a gentle tap on the countertop to settle any air bubbles, then serve immediately or keep refrigerated until guests arrive. The first spoonful should glide smoothly, with the crust offering a buttery crunch that contrasts beautifully with the silky lime mousse.
And now the fun part: watch your friends’ faces light up as they dig in. That satisfied sigh? That’s the sound of success. If you want to elevate the experience, pair these jars with a chilled glass of Prosecco or a tropical mocktail — the acidity of the lime will dance with the bubbles, creating a party‑ready duo.
That's it — you did it. But hold on, I've got a few more tricks that'll take this to another level...
Insider Tricks for Flawless Results
The Temperature Rule Nobody Follows
Never pour a hot crust mixture into a cold jar; the glass can crack, and the crust will become soggy. Instead, let the crumb‑butter blend cool to room temperature before pressing it in. This subtle temperature control keeps the crust crisp and ensures the glass stays intact, especially if you’re using thinner “mini” jars. I once tried a shortcut and ended up with a cracked jar that looked like a sad, broken heart.
Why Your Nose Knows Best
When mixing the lime juice into the cream cheese, trust your sense of smell more than the clock. If you can smell that bright citrus without any sour undertone, the balance is perfect. Over‑acidic mixtures will feel harsh on the palate, while under‑acidic ones taste cloyingly sweet. A quick sniff test saves you from a disastrous batch.
The 5‑Minute Rest That Changes Everything
After filling the jars, let them sit uncovered for five minutes before sealing. This brief rest lets a thin skin form on the surface, preventing the whipped cream topping from sliding off later. It also allows any tiny air bubbles to rise and pop, giving you a flawless, glossy finish.
Whipped Cream Whisper
Add a splash of vanilla or a pinch of lime zest to the whipped cream before beating. This tiny flavor boost ties the topping to the filling, creating a cohesive taste experience rather than a disjointed “cream on top” scenario. My friend tried plain whipped cream once and claimed it felt “out of place.”
The Secret of the Lime Zest
Never skip the zest! It contains essential oils that give the lime its aromatic punch. Grate the zest directly over the filling just before sealing, and you’ll capture those volatile compounds that evaporate quickly if added too early. This is why the aroma hits you first thing you lift the lid.
Creative Twists and Variations
This recipe is a playground. Here are some of my favorite ways to switch things up:
Coconut‑Lime Dream
Replace half the graham cracker crumbs with toasted coconut flakes and add a tablespoon of coconut milk to the filling. The result is a tropical twist that feels like a beach vacation in a jar.
Berry Burst
Swirl in a tablespoon of raspberry puree into the filling before spooning it into the jars. The tart berries complement the lime and add a gorgeous pink ripple that’s perfect for spring gatherings.
Chocolate Crunch
Mix crushed chocolate wafer cookies into the crust and sprinkle a few shaved dark chocolate curls on top of the whipped cream. The bittersweet chocolate balances the lime’s acidity for an elegant dessert.
Spiced Lime
Add a pinch of ground ginger or a dash of cayenne pepper to the filling for a subtle heat that awakens the palate. This variation is a hit at fall parties where you want a little warmth without heavy spices.
Miniature Pops
Instead of jars, use silicone ice‑cream molds to create bite‑size pops that you can freeze for a refreshing summer treat. Insert a small wooden stick before freezing, then dip the frozen pops in melted white chocolate for a glossy finish.
Storing and Bringing It Back to Life
Fridge Storage
Keep the sealed jars in the refrigerator for up to three days. The crust stays crisp, and the filling maintains its creamy texture. If you notice any condensation on the lid, simply wipe it dry before serving to avoid a watery surface.
Freezer Friendly
These jars freeze beautifully for up to one month. Before freezing, leave the lids slightly ajar to allow expansion, then seal tightly once fully frozen. To thaw, transfer to the fridge overnight; the texture remains silky, and the crust retains its crunch.
Best Reheating Method
If you prefer a slightly warmed version (think summer brunch), place the jar in a bowl of warm water for five minutes — not hot, just warm enough to coax the filling into a softer consistency. Add a tiny splash of water or milk before serving; the steam revives the mousse without compromising its structure.