Picture this: it's 11:37 p.m. on a Tuesday, my pajama pants have a suspicious streak of chocolate on them, and I'm standing in my kitchen holding a half-eaten Samoa Girl Scout cookie like it's some kind of forbidden relic. The lights are dimmed because I'm trying to pretend I'm not doing exactly what I'm doing — sabotaging my keto streak for the fourth time this month. But here's the thing: that caramel-coconut-chocolate combo hits like a freight train of nostalgia, and I bet you know exactly what I mean. That's when it hit me, standing there in my slippers, crumbs on my chin, that I needed to create a keto version that didn't taste like sad cardboard pretending to be dessert. I wanted the real deal — those gooey layers, the toasted coconut that crackles between your teeth, the chocolate that snaps like a promise kept, all without the sugar crash that sends me face-first into a nap at my desk the next morning.
Most keto copycats get this so wrong it's almost criminal. They either go too heavy on the artificial sweeteners until it tastes like a chemistry lab, or they skimp on the fat and end up with something that has the texture of roofing tiles. I tested twelve different versions over three weekends — my neighbors started avoiding eye contact because I kept showing up at their doors with Tupperware and desperation in my eyes. But version lucky number thirteen? Pure magic. The crust actually tastes like a shortbread that went to finishing school, the caramel layer uses heavy cream and butter in a way that makes you question reality ("this is keto?!"), and the chocolate top has that perfect snap when you bite into it. I dare you to taste this and not go back for seconds — actually, I double-dog dare you, because I ate half the batch before anyone else got to try it and I'm not even sorry.
What makes this version different is that I refused to compromise on anything. We're not just swapping sugar for erythritol and calling it a day. We're building layers of flavor that would make a pastry chef weep — toasting coconut until it smells like a tropical vacation, browning butter for that nutty depth, and using just enough vanilla to make people ask "what's your secret?" The texture game is strong here: crispy edges that shatter like thin ice, a caramel layer that stretches like taffy when you pull a bar apart, and coconut that provides that satisfying chew. If you've ever struggled with keto desserts that taste like diet food, you're not alone — and I've got the fix that'll make you feel like you're getting away with something naughty.
Stay with me here — this is worth it. By the time we're done, you'll have a pan of bars that taste like they came from a boutique bakery, minus the sugar hangover. Picture yourself pulling this out of the oven, the whole kitchen smelling like a Girl Scout cookie factory had a baby with a French patisserie, and you're about to become the most popular person at work tomorrow. Let me walk you through every single step — by the end, you'll wonder how you ever made it any other way.
What Makes This Version Stand Out
Flavor Bomb: We're using browned butter in both the crust and caramel, which adds a toasted, nutty dimension that makes people close their eyes when they take the first bite. It's like regular butter went on a spiritual journey and came back enlightened. The depth this creates is what separates amateur-hour keto desserts from the stuff that makes people convert to low-carb living.
Texture Heaven: Most keto bars have one texture — either crumbly-dry or weirdly gummy. These babies give you four distinct textures: the snap of chocolate, the chew of toasted coconut, the gooey stretch of caramel, and the tender crunch of shortbread. It's like a symphony where every section gets a solo, and your mouth is the concert hall.
Idiot-Proof Method: I've broken this down so thoroughly that even my friend who once burned water could nail it. We're talking specific visual cues, exact timing, and the moment when you should panic (spoiler: never). The hardest part is waiting for them to cool enough to cut without burning your face off.
Secret Ingredient Magic: The caramel uses a touch of coconut butter — not oil, not milk, but the whole-ground stuff — which gives it that authentic Samoa flavor without being obvious. It's like culinary osmosis; you can't pick it out, but you'd miss it if it vanished. This is what makes people say "these taste exactly like..." before trailing off mid-sentence.
Crowd Reaction Guarantee: I've served these at three parties now, and every single time, someone who "doesn't do keto" ends up hoarding a secret stash in their purse. At book club, Karen literally hid the last row behind her wine glass. The best part? Nobody believes they're low-carb until you tell them, and even then they think you're lying.
Make-Ahead Champion: These actually improve overnight as the flavors meld and the caramel sets up properly. Make them Sunday, and you'll have desserts through Friday — if they last that long. I've tested the holding power; they're still incredible after five days in the fridge, which is basically a miracle in the keto dessert world.
Ingredient Quality Flex: We're using Swerve confectioners' style here because it dissolves like a dream, but you could use allulose if you want that ultra-smooth mouthfeel. The point is, this recipe respects your ingredients instead of fighting them. When you use good stuff, the recipe becomes bulletproof.
Alright, let's break down exactly what goes into this masterpiece...
Inside the Ingredient List
The Flavor Base
Almond flour is the backbone here — not coconut flour, not some weird protein powder concoction that tastes like sadness. We're talking two cups of the good stuff, the kind that's blanched and finely ground so your crust doesn't feel like gravel. It provides that buttery, tender crumb that makes you think of real shortbread, plus it browns beautifully in the oven. Skip this and use coconut flour, and you'll create something that sucks all moisture from your mouth like a dessert vampire. If you're allergic to almonds, sunflower seed flour works, but add a teaspoon of lemon juice to prevent that weird green reaction with baking soda.
Swerve confectioners' style is our sweetener of choice because it dissolves completely, leaving no gritty texture or weird aftertaste. The powdered form is crucial — granulated erythritol will give you a crunchy, crystallized texture that's about as pleasant as biting into sand. We're using it in both the crust and caramel, which creates a cohesive flavor profile throughout. Don't try to substitute liquid stevia here; you'll throw off the liquid ratios and end up with a soggy mess that weeps like a disappointed parent.
The Texture Crew
Toasted unsweetened shredded coconut is where the magic lives — we're using a full cup and a half because we're not cowards. Toasting it yourself is non-negotiable; the pre-toasted stuff tastes like cardboard that's been left in a sauna. You want it golden-brown and fragrant, the kind that makes you want to sprinkle it on everything from yogurt to your morning coffee. The coconut provides that classic Samoa chew and tropical flavor that transports you to a beach somewhere, even if you're actually eating these in your car between errands.
Heavy cream creates the luxurious body of our caramel — none of that watery nonsense. We're using half a cup, heated until it just simmers, which gives the caramel that slow-motion stretch when you pull a bar apart. The fat content is crucial for mouthfeel; try to use a lighter cream and you'll get a sad, thin layer that disappears into the crust. Plus, the cream carries all the other flavors, making each bite taste bigger and more complex than it has any right to be.
The Unexpected Star
Coconut butter is the sleeper hit here — not coconut oil, which would make everything greasy, but the whole-ground meat that includes the fiber and protein. Just one tablespoon transforms our caramel from "pretty good for keto" to "I need to sit down and rethink my life choices." It adds body and that authentic Samoa flavor without being obviously coconutty. If you can't find it, make your own by blitzing unsweetened shredded coconut in a food processor for 8-10 minutes until it becomes butter, scraping down every minute or so.
Pure vanilla extract might seem basic, but using the good stuff here matters — we're talking real extract, not imitation vanilla flavoring that tastes like a candle. The vanilla bridges all the other flavors, making the chocolate taste more chocolatey, the caramel more caramel-y, the coconut more coconutty. It's like the conductor of our flavor orchestra, ensuring every note hits at exactly the right time. Splurge on the Mexican vanilla if you can find it; the floral notes will make you swoon.
The Final Flourish
Keto-friendly chocolate chips finish the whole thing off with that satisfying snap. We're using half a cup, melted and spread into a thin layer that cracks beautifully when you cut the bars. Look for ones that are at least 70% cacao and sweetened with erythritol or allulose — the Lily's brand works great, but ChocZero's chips melt smoother if you're feeling fancy. The chocolate isn't just a topping; it provides a bitter counterpoint to all the sweet richness underneath, keeping the whole thing from being cloying.
Everything's prepped? Good. Let's get into the real action...

The Method — Step by Step
- Start by preheating your oven to 350°F — and I mean actually preheat it, don't just turn it on and immediately shove the pan in there like an animal. While it's heating, line an 8x8 pan with parchment paper, leaving wings on the sides so you can lift the whole thing out later. Spray it lightly with cooking spray; yes, even though parchment is non-stick, we're covering our bases because nothing ruins your day like a crust that decides to become one with the pan. This is the foundation of our operation, and we're building a skyscraper of flavor here, people.
- For the crust, whisk together almond flour, Swerve, and salt in a medium bowl until they're best friends — about 30 seconds of whisking should do it. Pour in your melted butter and stir with a fork until it looks like wet sand at the beach, the kind that holds together when you squeeze it but crumbles when you poke it. Press this mixture firmly into your prepared pan, using the bottom of a measuring cup to really pack it down — we're talking serious pressure here, like you're trying to impress someone with your strength. Prick it all over with a fork; this prevents air bubbles from forming and creating a lunar landscape on your beautiful crust.
- Slide that crust into the oven and bake for 12-15 minutes, until the edges are just starting to turn golden brown and your kitchen smells like you're living inside an almond croissant. Don't walk away from the oven here — almond flour goes from perfect to burnt faster than gossip spreads at a family reunion. When it's done, pull it out and let it cool while you make the caramel; this cooling period is crucial because hot crust plus hot caramel equals a soggy mess that'll make you question all your life choices.
- Now for the caramel — this is where the magic happens, so pay attention. In a medium saucepan over medium heat, melt your butter until it starts to foam and turn golden. This is brown butter territory, and it's where flavor lives. Swirl the pan occasionally, watching for little brown specks to form at the bottom; when it smells nutty and amazing, like you've stumbled into a French bakery, you're there. Add the Swerve and heavy cream carefully — it'll bubble up like a science experiment, so don't wear your favorite shirt for this part.
- Stir constantly with a heatproof spatula, scraping the bottom and sides, until the mixture thickens and coats the spatula like velvet. This takes about 5-7 minutes, and you'll know it's ready when you can drag your spatula through and see the bottom of the pan for a few seconds before it fills back in. Remove from heat and stir in vanilla, salt, and coconut butter until smooth — it should look like liquid gold and smell like heaven. If you've got kids, this is when they start materializing in the kitchen asking for "just a taste."
- Fold in your toasted coconut until every strand is coated in caramel — it should look like you're making a very fancy, very sticky salad. Pour this mixture over your cooled crust and spread it into an even layer; the back of a spoon works great here, or live dangerously and use an offset spatula. Don't worry if it looks like too much coconut; it'll settle as it cools and create that perfect ratio of caramel to coconut in every bite. Let this cool for about 10 minutes while you melt your chocolate.
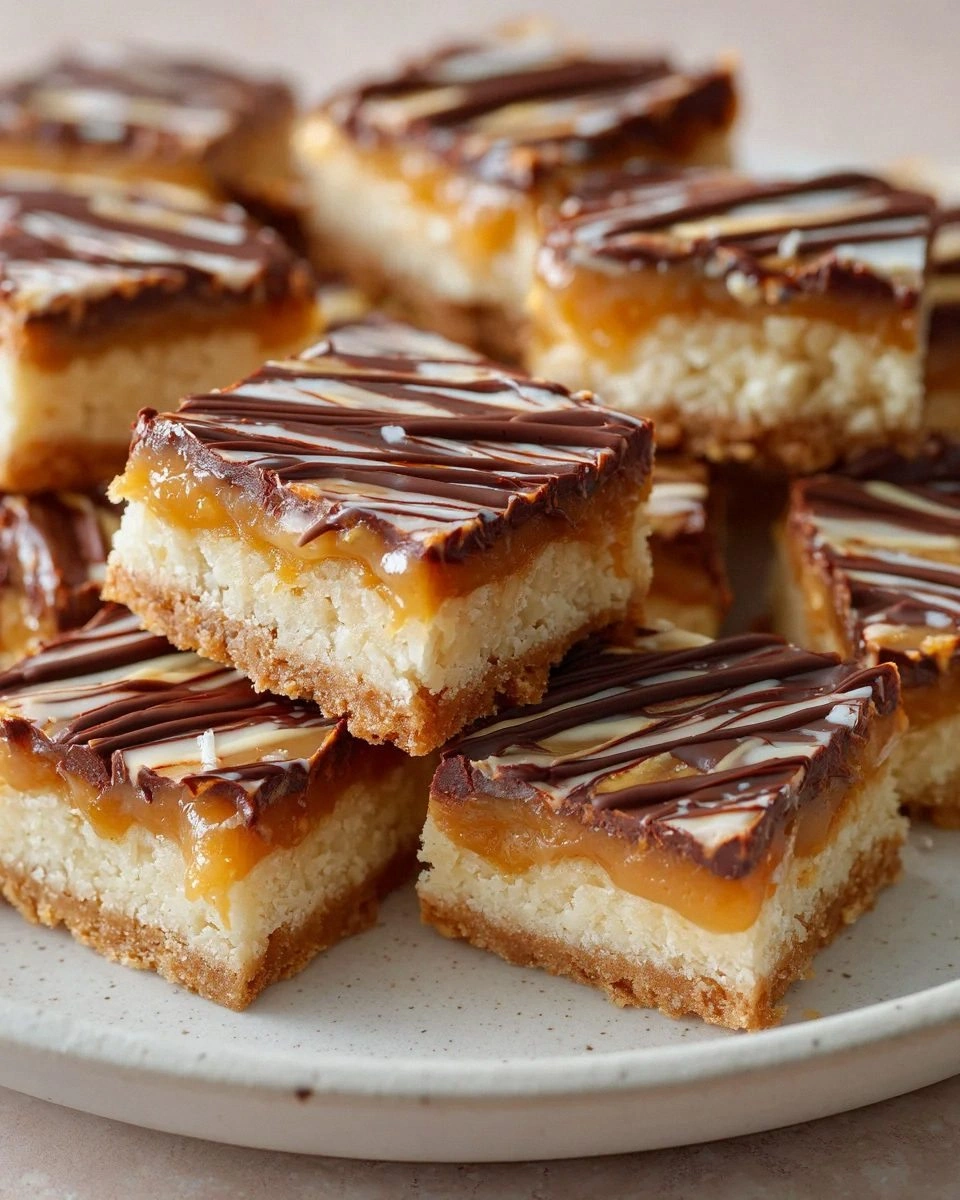
- In a microwave-safe bowl, heat your chocolate chips in 30-second bursts, stirring between each one, until smooth and glossy. Add the coconut butter and stir until combined — this helps the chocolate set up with that perfect snap when you bite into it. Pour the melted chocolate over the coconut layer and tilt the pan to create a thin, even coating that reaches all the corners. Use an offset spatula or the back of a spoon to smooth it out, but don't overwork it; you want it to look rustic and homemade, not like a machine did it.
- Now comes the hardest part: waiting. Refrigerate the whole thing for at least 2 hours, or until the chocolate is completely set and the caramel has firmed up enough to cut cleanly. I know, I know — you want to eat it now, but trust me on this. When you're ready to serve, lift the whole thing out using the parchment wings and cut into squares with a sharp knife heated under hot water. Wipe the knife between cuts for picture-perfect squares that'll make you look like a professional pastry chef instead of someone who usually burns toast.
That's it — you did it. But hold on, I've got a few more tricks that'll take this to another level...
Insider Tricks for Flawless Results
The Temperature Rule Nobody Follows
Here's the thing about working with sugar substitutes — they behave differently than real sugar, and temperature is everything. When you're making the caramel, if the heat is too high, the Swerve will crystallize and create a grainy texture that feels like you're eating sand. Too low, and it never thickens properly, staying runny like a sad sauce. You want a gentle simmer where you see small bubbles breaking the surface, not a rolling boil that looks like a jacuzzi. A friend tried skipping this step once — let's just say it didn't end well, and she ended up with caramel that poured like milk and tasted like disappointment.
Why Your Nose Knows Best
Don't underestimate the power of aroma cues in this recipe — they're your built-in thermometer and timer. When the coconut is perfectly toasted, it'll smell like you're at a tropical resort, not like burned popcorn. The brown butter is ready when it goes from smelling like regular melted butter to having this rich, nutty aroma that makes you want to bottle it and wear it as perfume. And the caramel? When it's done, your kitchen will smell like you hired a professional baker to live in your house. Trust these smells — they're more reliable than any timer, because ovens lie but chemistry doesn't.
The 5-Minute Rest That Changes Everything
After you pour the caramel over the crust, let it sit for exactly five minutes before adding the chocolate. This brief rest allows the caramel to set up just enough that the chocolate doesn't sink in and create a marbled mess. It also prevents the heat from the caramel from seizing your chocolate, which would create those awful white streaks that make your bars look diseased. I discovered this by accident when my phone rang and I got distracted — sometimes the best discoveries happen when you're not trying so hard to be perfect.
The Storage Secret for Maximum Flavor
Here's where most people mess up — they eat these bars immediately and miss out on the flavor development that happens overnight. The caramel needs time to meld with the coconut, the chocolate needs to bloom properly, and all the flavors need to get to know each other better. Store them in an airtight container with a small piece of parchment paper between layers, and they'll actually taste better on day two. It's like they're aging like fine wine, except it's dessert and you don't have to wait twenty years to enjoy it.
Creative Twists and Variations
This recipe is a playground. Here are some of my favorite ways to switch things up:
Pecan Pie Samoa Bars
Replace half the coconut with chopped pecans that you've toasted until fragrant — about 8 minutes at 350°F. The pecans add a deeper, more complex flavor that screams autumn, and they pair beautifully with the caramel. Add a pinch of cinnamon to the crust and suddenly you've got something that tastes like Thanksgiving and Girl Scout cookies had a beautiful baby. This version is especially dangerous because it feels sophisticated enough to serve at dinner parties, but secretly it's still finger food that makes a mess in the best possible way.
Salted Mocha Madness
Dissolve 2 teaspoons of instant espresso powder in the heavy cream before adding it to the caramel — it adds a subtle coffee flavor that makes the chocolate taste more chocolatey. Sprinkle flaky sea salt on top of the chocolate layer before it sets; the salt crystals create little flavor explosions that wake up your whole mouth. If you've ever struggled with desserts that taste one-dimensional, this is your solution. The coffee enhances everything else without screaming "I PUT COFFEE IN THIS."
Tropical Vacation Bars
Add the zest of one lime to both the crust and the caramel — it brightens everything up and makes these taste like you're eating them on a beach somewhere. Replace the vanilla extract with coconut extract for double coconut power, and add a tablespoon of rum extract to the caramel for that piña colada vibe. These are dangerous because they make you want to mix up a cocktail and pretend you're on vacation, even if you're actually eating them in your car during your lunch break.
Double Chocolate Decadence
Use dark chocolate in the crust — replace 1/4 cup of almond flour with cocoa powder and add an extra tablespoon of butter. For the topping, mix half milk chocolate style and half dark chocolate chips to create a more complex chocolate flavor that keeps you coming back for more. The double chocolate thing might sound like overkill, but it actually creates layers of chocolate flavor that make each bite interesting instead of just sweet.
Pumpkin Spice Autumn Edition
Add 1/4 cup of pumpkin puree to the caramel along with 1 teaspoon of pumpkin pie spice — the pumpkin disappears into the caramel but adds this creamy texture and warm spice that makes these perfect for October. Replace half the coconut with pepitas (pumpkin seeds) that you've toasted until they pop like popcorn. This version tastes like fall in bar form, and they're gone faster than Halloween candy in an office break room.
Peanut Butter Cup Samoas
Swirl 1/4 cup of natural peanut butter into the caramel when you add the coconut — just drop spoonfuls on top and use a knife to marble it through. The peanut butter adds richness and that salty-sweet thing that makes Reese's cups so addictive. Use peanut butter chips instead of chocolate chips on top for the full peanut experience. Warning: these are so good they might ruin regular Samoas for you forever.
Storing and Bringing It Back to Life
Fridge Storage
These bars will keep in an airtight container in the fridge for up to a week — though honestly, they've never lasted more than four days in my house. Layer them between sheets of parchment paper to prevent sticking, and make sure the container is truly airtight because fridge odors are sneaky little monsters that'll turn your beautiful dessert into "why does this taste like leftover pizza?" The cold actually helps the flavors meld together, so day three might be peak deliciousness.
Freezer Friendly
Wrap individual bars tightly in plastic wrap, then pop them into a freezer bag — they'll keep for up to three months without losing quality. The key is wrapping them individually so you can grab one without thawing the whole batch, because nothing kills a dessert craving faster than waiting for something to defrost. When you're ready to eat, let them sit at room temperature for 15-20 minutes, or microwave for 10-15 seconds if you're impatient (and you will be).
Best Reheating Method
If they've been in the fridge and you want that just-made experience, let them sit at room temperature for 10 minutes before serving. The chocolate regains its snap, the caramel softens to that perfect stretchy consistency, and the crust returns to its tender-crisp glory. Add a tiny splash of water to the container before microwaving for 8-10 seconds — it creates steam that prevents the chocolate from getting that weird dried-out texture that microwaved chocolate sometimes gets.