Why you'll love this recipe
- Crowd-pleaser: bite‑size cheesy goodness for any gathering
- 30‑minute: total prep and cook under half an hour
- Make‑ahead: assemble the day before and grill when needed
- Kid‑approved: mild cheddar melts into a fun finger food
- No‑fancy‑gear: only a grill pan and skewers required
I first pulled these golden skewers from the grill at a backyard BBQ in late summer, the buttery aroma mingling with the faint scent of fresh-cut herbs. My teenage cousins devoured them before the first sip of lemonade, and the sound of the cheese stretching made me grin like a kid. Since that night they've become my go‑to snack for anything from movie marathons to impromptu game‑day gatherings. Now every time I hear that sizzle, I’m reminded of that sun‑lit afternoon and the simple joy of a perfectly crispy bite.
The first time I served them at a potluck, the whole table gathered around the grill, eager for a taste. The buttery crust crackled under the fork, releasing a puff of warm, melty cheddar that was impossible to resist. That moment cemented the skewers as a beloved staple in my kitchen, and I still hear the same delighted exclamations whenever I bring them out.
The story
The moment the butter hits the hot grill, a sizzle erupts, and the air fills with a buttery, toasty perfume. Golden edges crisp up while the cheddar inside softens into a molten ribbon. One bite delivers that perfect snap followed by a gooey, cheesy pull.
I first discovered these skewers at my niece's birthday party, when I was scrambling for a finger food that wouldn't melt all over the table. The scent of toasted bread and melted cheese instantly won over the kids, and I knew I had found a new go‑to snack. Since then they've become a staple whenever I need something quick and crowd‑pleasing.
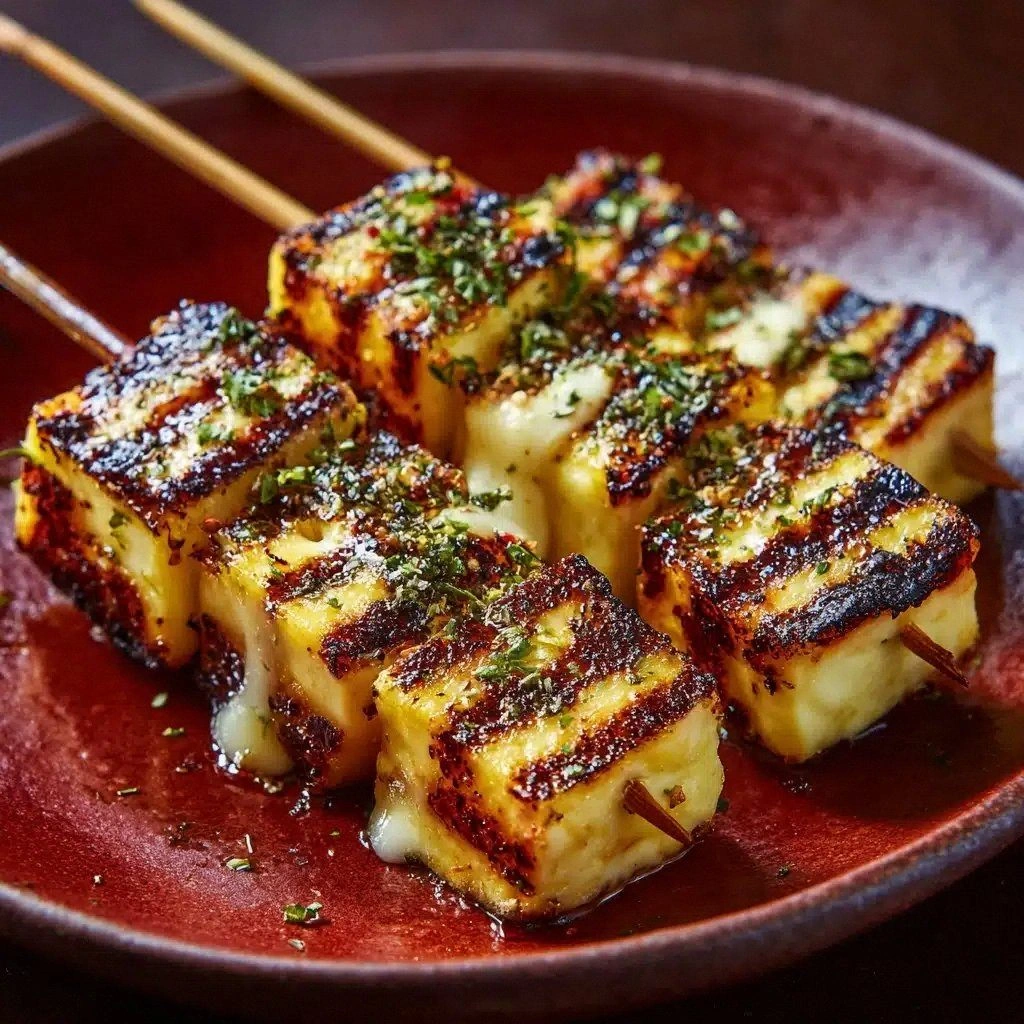
What sets this version apart is the simple flatten‑and‑cut technique: each slice of bread is rolled thin, cut into bite‑size squares, and then threaded onto a skewer. This creates more surface area for that coveted golden crust while keeping the cheese neatly sealed inside. No fancy molds or deep‑fried batters—just a clever twist on a classic.
The flavor profile balances salty, sharp cheddar with a buttery, toasted exterior, while optional herbs add a fragrant lift. The crisp crust offers a satisfying crunch, contrasted by the creamy, melty interior that stretches with every bite. A hint of garlic or Italian seasoning can turn the snack from simple to sophisticated in seconds.
Serve these skewers as a party starter, alongside a simple green salad, or paired with a warm bowl of tomato soup for a comforting dip. They’re perfect for a casual game night, a quick weeknight snack, or even a make‑ahead option for a potluck. Their portable shape makes them easy to plate and even easier to eat standing up.
Don’t let the idea of skewering intimidate you; the technique is straightforward and the total time stays under 20 minutes. With just a grill pan, a brush, and a couple of simple steps, you’ll have golden, cheesy bites without any culinary gymnastics. Even beginners can achieve that restaurant‑quality crisp.
I’ve tested this recipe countless times—my kids can’t get enough, and even my picky‑eater sister asks for seconds. After a few rounds on the grill, I’ve fine‑tuned the heat and butter ratio to guarantee that perfect bite every time. Now it’s my secret weapon for impromptu gatherings.
Why This Recipe Works
- Flattened bread increases surface area, ensuring even browning.
- Skewering traps melted cheese, preventing spillover and keeping bites tidy.
- Butter‑oil blend creates a crisp exterior while preserving interior moisture.
Ingredient notes & substitutions
bread, crusts removed
A sturdy white bread provides a crisp base that holds up to grilling.
cheddar cheese (or cheese of choice)
Sharp cheddar melts beautifully and adds a rich, tangy flavor.
melted butter
Butter adds richness and helps achieve a golden, crunchy crust.
olive oil
Olive oil raises the smoke point and keeps the crust from drying out.
garlic powder
Adds a subtle aromatic depth without soggy moisture.
Equipment you'll need
Ingredients
- 8 slices of bread, crusts removed
- 4 slices of cheddar cheese (or cheese of choice)
- 2 tablespoons melted butter
- 1 tablespoon olive oil
- Optional: garlic powder, Italian seasoning, or chopped fresh herbs for extra flavor
- Wooden skewers
Before You Start
- Soak wooden skewers in water 15 minutes
- Melt butter and mix with olive oil
- Remove crusts and slice bread
- Flatten bread slices with rolling pin
Instructions
- 1Step 1
Make sandwiches with bread and cheese slices, flatten with a rolling pin, and cut into squares.
- 2Step 2
Thread the sandwich squares onto skewers.
- 3Step 3
Brush skewers with butter and oil, season if desired, then grill until golden and cheese is melted.
- 4Step 4
Enjoy warm with dipping sauces like tomato soup, marinara, or ranch.
Pro tips
Soak skewers first
Place wooden skewers in water for at least 15 minutes to prevent burning.
Flatten bread evenly
Use a rolling pin to roll each slice to about 1/4‑inch thickness for uniform crispness.
Brush both sides
Generously coat each square with the butter‑oil mixture before grilling for even gold.
Medium heat is key
Cook over medium heat; too hot will burn the crust before cheese melts.
Turn gently with tongs
Rotate skewers once the first side is golden to avoid cheese leakage.
Season after grill
Add garlic powder or herbs right after removing from heat to keep flavors bright.
Serve immediately
The cheese is at its meltiest within two minutes of off‑heat.
Use a non‑stick pan
A non‑stick surface reduces sticking and makes cleanup a breeze.
Variations to try
Italian Herb Skewers
Mix dried oregano, basil, and a pinch of Parmesan into the butter before brushing.
Spicy Cajun Kick
Stir Cajun seasoning into the oil and finish with a dash of hot sauce.
Dairy‑Free Version
Swap cheddar for a sharp plant‑based cheese and use vegan butter.
Mini Slider Bites
Cut the squares smaller, use mini skewers, and serve as bite‑size party sliders.
Serving Suggestions
Troubleshooting
Cheese slides out
Press the cheese firmly between bread layers and secure with a tighter skewer.
Bread sticks to pan
Make sure the butter‑oil coating is generous and pre‑heat the pan fully.
Skewers burn quickly
Soak skewers longer or lower the heat; move them to a cooler part of the pan.
Cheese under‑melts
Cover pan briefly with a lid for the last minute to trap steam.
Storage & make-ahead
Refrigerator
Keep assembled, un‑grilled skewers in an airtight container; they stay fresh 2 days.
Freezer
Freeze raw skewers in a single layer, then bag; up to 1 month. Thaw in fridge before grilling.
Best way to reheat
Reheat in a hot skillet with a dab of butter, turning until golden and cheese melts again.
Make-ahead
Prepare the sandwiches and skewer them up to a day ahead; keep refrigerated and grill just before serving.
Ingredients
- 8 slices of bread, crusts removed
- 4 slices of cheddar cheese (or cheese of choice)
- 2 tablespoons melted butter
- 1 tablespoon olive oil
- Optional: garlic powder, Italian seasoning, or chopped fresh herbs for extra flavor
- Wooden skewers
Instructions
- 1Make sandwiches with bread and cheese slices, flatten with a rolling pin, and cut into squares.
- 2Thread the sandwich squares onto skewers.
- 3Brush skewers with butter and oil, season if desired, then grill until golden and cheese is melted.
- 4Enjoy warm with dipping sauces like tomato soup, marinara, or ranch.