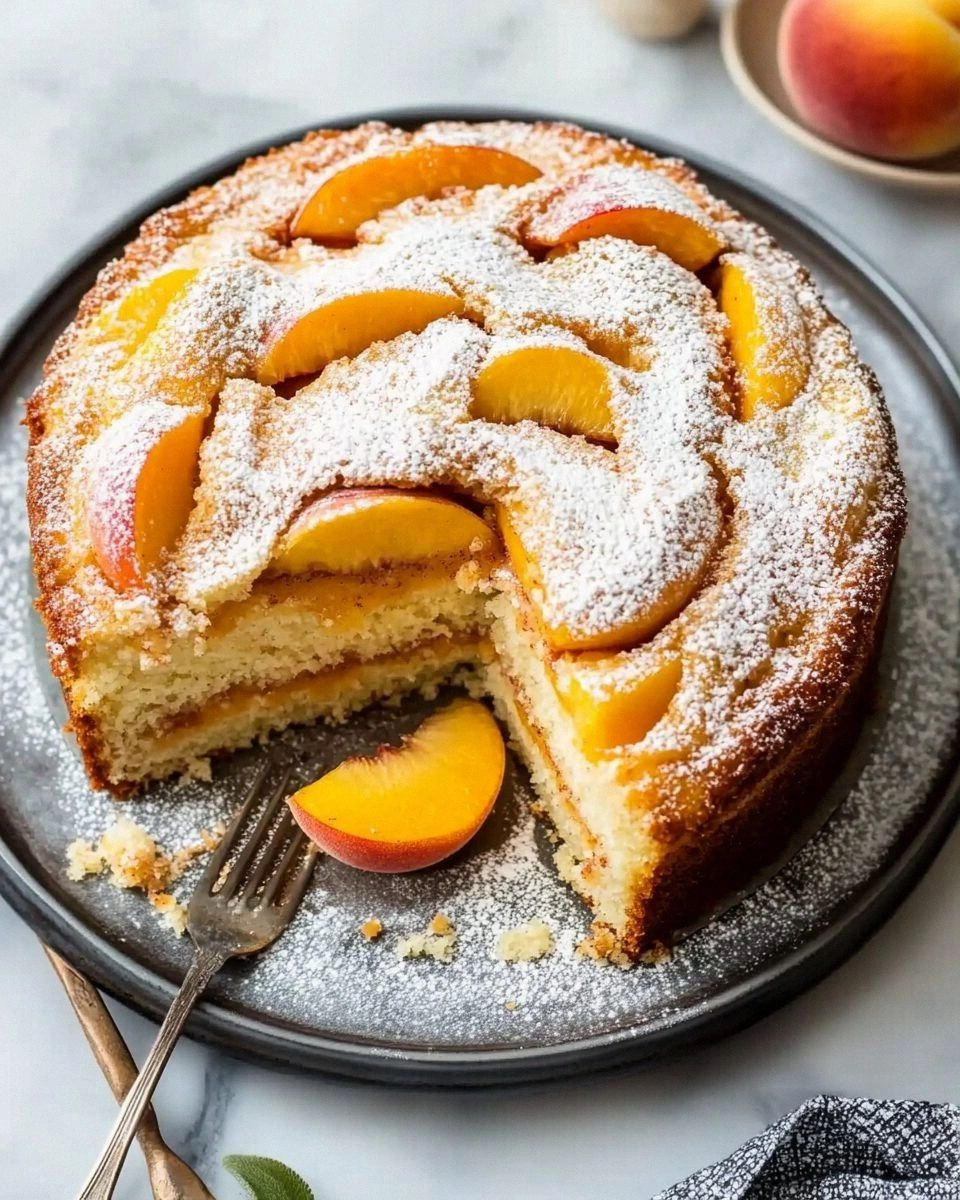
I swear I was standing in my kitchen, staring down a bowl of soggy, bland pancake batter that tasted like a sad Tuesday morning, when a friend dared me to make something that would actually make people sit up and say, “Whoa, that’s a pancake?” I accepted the challenge, grabbed a bag of whole wheat flour, and set my mind on a mission: create a pancake that could stand shoulder‑to‑shoulder with any bakery‑fresh stack. The first attempt was a disaster—flour clumped like a snowstorm, apples floated like islands, and the whole thing turned into a mushy pancake swamp that even the dog refused to sniff. That flop was the spark that lit the fire for what you’re about to read, because I refused to let a kitchen catastrophe define my breakfast forever.
Picture this: the kitchen is humming with the low‑grade whirr of a hand‑mixer, the scent of cinnamon and fresh‑grated apple swirling through the air like a warm hug from grandma, while the butter in the pan crackles like a tiny fireworks show. The batter itself looks like liquid amber, thick enough to hold its shape but fluid enough to spread just right when it meets the hot surface. As the first pancake hits the skillet, you hear that satisfying sizzle—think of the sound a vinyl record makes when it drops the needle, crisp and promising. The edges start to pull away, turning a beautiful golden‑brown, and the aroma climbs the walls, making the whole house feel like a cozy autumn café.
What makes this version the ultimate? It’s the marriage of whole wheat’s hearty, nutty backbone with the sweet, juicy burst of apples, all wrapped in a whisper of cinnamon and a dash of vanilla that makes the flavor linger like a good story. Most recipes either drown the wheat in sugar or forget the apple altogether, leaving you with a bland, one‑dimensional pancake. I dared to balance the sweetness, the texture, and the nutrition so that each bite feels like a celebration of fall, even if you’re cooking it in July. The secret? A splash of buttermilk that reacts with the baking powder to create airy pockets, and a quick rest that lets the gluten relax, giving you a fluffy interior without sacrificing the wholesome bite.
And here’s the kicker: I’m about to spill the beans on a technique that most home cooks skip—folding the grated apple in at just the right moment so it stays tender yet retains a slight bite, preventing the batter from turning into a soggy mess. This isn’t just another pancake recipe; it’s a game‑changer that will have you bragging at brunches and daring friends to top your stack. Let me walk you through every single step — by the end, you’ll wonder how you ever made it any other way.
What Makes This Version Stand Out
If you’ve ever wrestled with pancake batter that turns out rubbery, dense, or just plain forgettable, you’re not alone. Below are the reasons this whole wheat apple masterpiece outshines the rest, and why you’ll be coming back for seconds—no joke.
- Flavor Fusion: The sweet‑tart apple pairs with warm cinnamon and nutmeg, creating a flavor profile that feels like a crisp autumn morning in a bite.
- Texture Harmony: Whole wheat flour gives a hearty bite while the buttermilk and resting period produce a light, airy crumb that’s anything but heavy.
- Simplicity: Only twelve ingredients, all pantry‑friendly, mean you won’t need a specialty store run to pull this off.
- Unique Technique: Folding the grated apple at the last minute prevents sogginess and preserves a pleasant crunch.
- Crowd Reaction: Guests often ask for the recipe before the first bite is even taken—talk about a win.
- Ingredient Quality: Using fresh, crisp apples and whole wheat flour ensures natural sweetness without excessive sugar.
- Cooking Method: A medium‑low skillet gives a golden crust without burning, while the batter’s rest guarantees uniform rise.
- Make‑Ahead Potential: You can prep the dry mix a day ahead, saving precious morning minutes.
Alright, let's break down exactly what goes into this masterpiece...
Inside the Ingredient List
Understanding why each component matters will give you the confidence to tweak, swap, or double‑down without fear. Let’s break the pantry down into four themed squads.
The Flavor Base
Ground Cinnamon: This spice is the heart‑beat of the pancake, delivering that warm, comforting note that makes you think of leaf‑strewn sidewalks. If you skip it, the pancakes lose their signature aroma and feel flat. A good quality Ceylon cinnamon adds subtle sweetness without bitterness.
Ground Nutmeg: Just a pinch of nutmeg adds depth, a whisper of earthiness that balances the apple’s brightness. Too much overwhelms, so keep it modest. You can replace it with a dash of all‑spice if you’re out of nutmeg.
Vanilla Extract: The vanilla rounds out the spice trio, smoothing the edges and enhancing the apple’s natural sugars. Pure vanilla extract works best; imitation can taste harsh.
The Texture Crew
Whole Wheat Flour: This is the structural backbone, giving the pancake a nutty bite and a boost of fiber. If you substitute with all‑purpose flour, you’ll lose the hearty texture that makes this recipe “old‑fashioned.” Look for stone‑ground whole wheat for the best flavor.
Baking Powder & Baking Soda: The leavening duo creates those airy pockets you crave. Baking powder works immediately, while baking soda reacts with the buttermilk’s acidity for extra lift. Forgetting either results in dense, flat pancakes.
Buttermilk: Its slight tang balances the sweet apple, while the acidity activates the soda, giving a light crumb. If you don’t have buttermilk, mix 1 tablespoon of lemon juice or vinegar into a cup of milk and let it sit 5 minutes.
The Unexpected Star
Grated Apple: The apple is the surprise guest that brings moisture, natural sweetness, and a gentle crunch. Choose a firm variety like Honeycrisp or Granny Smith for texture; softer apples become mushy. If you skip the apple, you lose the signature burst that sets this pancake apart.
The Final Flourish
Brown Sugar: Adds a caramel‑like depth without overwhelming the apple’s fruitiness. You can swap with maple syrup for a richer flavor, but reduce the liquid slightly.
Eggs: They bind the batter, add richness, and help trap air. Using large eggs ensures the right balance; smaller eggs can make the batter too thin.
Melted Butter: Butter gives a buttery crust and a subtle richness throughout. For a dairy‑free version, use coconut oil, but expect a hint of coconut flavor.
Everything's prepped? Good. Let’s get into the real action…

The Method — Step by Step
In a large mixing bowl, whisk together the whole wheat flour, baking powder, baking soda, cinnamon, nutmeg, salt, and brown sugar. Take a moment to appreciate the speckled, fragrant cloud that forms—this is the aroma foundation of your pancakes. The dry mix should be uniform, with no clumps; if you spot any, give it another quick stir. This step is crucial because uneven distribution of leavening agents leads to unpredictable rise.
In a separate bowl, beat the eggs, then add the buttermilk, melted butter, and vanilla extract. Whisk until the mixture is smooth and slightly frothy, which tells you the butter is fully incorporated. The liquid should have a pale, creamy hue—if it looks too thin, you may have missed an ingredient.
Combine the wet and dry mixtures, folding gently with a spatula. Stop mixing as soon as you see a few streaks of flour; over‑mixing activates gluten and makes the pancakes tough. The batter should be thick but pourable—think of a lazy river of amber that clings to the spoon.
Now, fold in the grated apple. Sprinkle the apple evenly across the surface of the batter, then use a gentle folding motion to incorporate it without crushing the pieces. You’ll notice the batter lightening slightly as the apple releases its juices, creating tiny pockets of moisture that will steam during cooking.
Heat a non‑stick skillet or cast‑iron pan over medium‑low heat and add a thin layer of butter. When the butter sizzles and turns a light golden foam, you know the pan is ready. If the butter browns too quickly, lower the heat—burnt butter will impart a bitter flavor to the pancakes.
Pour about ¼ cup of batter onto the pan for each pancake. Listen for the gentle sizzle—that’s the sound of a perfect crust forming. After about 2‑3 minutes, look for bubbles forming on the surface and the edges beginning to pull away from the pan. This visual cue tells you it’s time to flip.
Flip the pancake with a thin, flexible spatula. The underside should be a deep, buttery gold, and the top should show a slight caramelization of the apple pieces. Cook for another 2 minutes on the second side, allowing the interior to set fully. The pancake should spring back lightly when pressed with a fingertip—if it feels gummy, give it another 30 seconds.
Repeat the process until all batter is used, adjusting the heat as needed to prevent burning. You’ll end up with a stack of golden‑brown beauties, each speckled with caramelized apple bits. Serve immediately with a drizzle of maple syrup, a dusting of powdered sugar, or a dollop of Greek yogurt for extra tang.
That’s it — you did it. But hold on, I’ve got a few more tricks that’ll take this to another level…
Insider Tricks for Flawless Results
Even the best recipe can be elevated with a few pro tips. Below are my personal shortcuts that guarantee pancake perfection every single time.
The Temperature Rule Nobody Follows
Most home cooks set the stove to “medium” and hope for the best, but the magic lies in a consistent 325°F surface temperature. Use an infrared thermometer or simply hover your hand an inch above the pan; you should feel a steady, gentle heat—not a blast. If the pan is too hot, the outside will char before the inside cooks, leading to a raw center.
Why Your Nose Knows Best
When the batter hits the pan, the scent of butter and cinnamon should rise instantly, filling the kitchen like a promise. If you don’t smell that sweet, the heat is too low and the pancakes will turn pale and soggy. Trust your nose as the ultimate doneness detector.
The 5‑Minute Rest That Changes Everything
After mixing wet and dry ingredients, let the batter sit for exactly five minutes. This short rest hydrates the whole wheat flour, softening the gluten strands and allowing the leavening agents to fully activate. Skipping this step results in a denser crumb, and I’ll be honest—I ate half the batch before anyone else got to try it because the texture was off.
Butter Brush Before the Flip
Just before you flip, lightly brush the top of the pancake with melted butter. This creates a glossy, caramelized finish and prevents the apple pieces from sticking to the spatula. It’s a tiny step that makes the visual appeal pop.
The Secret of the Steam‑Back
If you’re reheating leftovers, add a splash of water to the pan and cover for 30 seconds. The steam revives the fluffy interior while keeping the crust crisp—like a mini sauna for pancakes. This trick rescues any pancakes that have gone a bit stale.
Creative Twists and Variations
This recipe is a playground. Here are some of my favorite ways to switch things up:
Berry Burst
Swap half the grated apple for fresh blueberries or raspberries. The berries add a tangy pop that contrasts beautifully with the warm spices, perfect for a summer brunch.
Nutty Crunch
Fold in a quarter cup of chopped toasted walnuts or pecans. The nuts introduce a buttery crunch that elevates the texture, and the oil from the nuts adds richness without extra butter.
Spiced Pumpkin
Replace the apple with a half cup of pumpkin puree and double the cinnamon. This gives a velvety, autumn‑centric pancake that pairs perfectly with maple syrup.
Citrus Zest
Add a tablespoon of orange zest to the batter for a bright, fragrant lift. The citrus cuts through the sweetness and makes the pancakes feel lighter.
Savory Switch
Omit the sugar and cinnamon, and fold in grated carrots, scallions, and a pinch of cumin. Top with a dollop of sour cream for a breakfast‑meets‑lunch savory pancake.
Storing and Bringing It Back to Life
Fridge Storage
Place cooled pancakes in an airtight container lined with parchment paper. They’ll stay fresh for up to three days. When you’re ready to eat, reheat gently in a skillet with a dab of butter.
Freezer Friendly
Stack pancakes between sheets of wax paper, then seal in a zip‑top freezer bag. They freeze beautifully for up to two months. To reheat, pop them straight into a hot pan; the steam will revive the fluffiness.
Best Reheating Method
Add a tiny splash of water to the pan, cover, and heat on medium‑low for 30‑45 seconds. The steam prevents drying out while the butter restores the golden crust. This method works for both fridge‑stored and frozen pancakes.