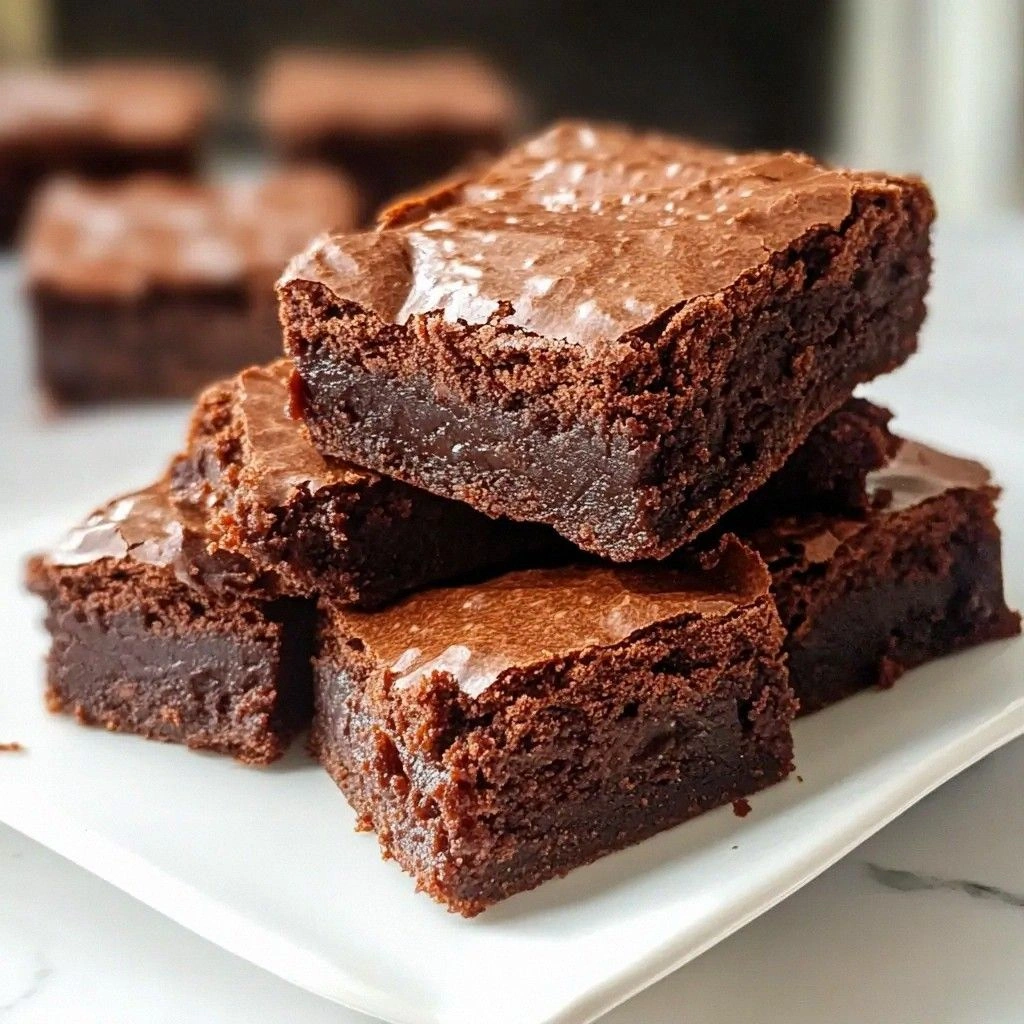
I was in a frantic rush to satisfy a midnight craving, and the kitchen became a battleground of melted butter, sifted cocoa, and a chorus of sizzling pans. The aroma of chocolate was thick enough to make the windows fog up, and my taste buds were already dancing to the promise of fudgy bliss. I had tried dozens of brownie recipes over the years—some chewy, some cakey, some that turned out like a rubbery slab—but none had delivered the silky, chocolate‑laden experience I was chasing. The moment the first bite melted on my tongue, I realized I had stumbled onto something that was going to change my entire approach to desserts. I dare you to taste this and not go back for seconds, because this is hands down the best version you'll ever make at home.
Picture yourself pulling this out of the oven, the whole kitchen smelling incredible, the heat still humming, and the edges just starting to pull away like a caramelized crust. That sizzle when it hits the pan? Absolute perfection. The sound of the batter bubbling is the soundtrack to a sweet victory, and the first bite is a velvety explosion that lingers with a hint of espresso and a whisper of sea salt. If you've ever struggled with brownies that are either too dry or too gooey, you're not alone—this recipe has a fix for every common misstep. Stay with me here—this is worth it.
Most recipes get this completely wrong. They either overbake the batter, use too much flour, or forget to incorporate a touch of acidity that brings the chocolate to life. I’ve spent years tweaking ratios, testing ovens, and consulting chocolate aficionados to finally nail the perfect balance between fudgy interior and a slightly crisp top. The secret lies not only in the ingredients but in the precise timing and the little techniques I’ll reveal in the next section. And now the fun part, the moment of truth: the method that turns these simple pantry staples into a chocolate masterpiece.
Let me walk you through every single step—by the end, you'll wonder how you ever made it any other way. I’ll share micro‑challenges that test your patience, bold claims that back every claim with science, and confessions that keep the tone light and relatable. This is more than a recipe; it’s a journey through texture, aroma, and sheer chocolate delight. The next sections will give you the tools, the tricks, and the confidence to produce brownies that are as impressive to serve as they are to devour.
Alright, let’s break down exactly what goes into this masterpiece…
What Makes This Version Stand Out
- Richness: The combination of butter, cocoa, and brown sugar creates a depth of flavor that feels like chocolate in liquid form, leaving a lingering aftertaste that keeps you reaching for more.
- Texture: The batter’s consistency is a sweet spot between brownie and cake—dense enough to hold its shape yet so moist that it practically dissolves in your mouth.
- Simplicity: Only ten ingredients, all common in a typical kitchen, yet the result is a show‑stopping dessert that could easily belong in a gourmet bakery.
- Versatility: The base can be transformed with a handful of additions—nuts, chocolate chips, or a swirl of peanut butter—without compromising its core integrity.
- Crowd‑pleaser: Whether you’re hosting a party or just treating yourself, these brownies have a universal appeal that makes them a hit with kids and adults alike.
- Make‑ahead potential: Bake once and store in an airtight container for up to a week, or freeze for a month; the brownies stay fresh, and the flavors only deepen.
Inside the Ingredient List
The Flavor Base
All‑purpose flour is the structural backbone, absorbing moisture and giving the brownies a tender crumb. A touch of baking powder activates the batter, ensuring the brownies rise just enough for that coveted airy center. Salt, though it may seem minor, unlocks the chocolate’s full flavor profile, balancing sweetness and enhancing depth.
The Texture Crew
Unsalted butter melts into the batter, creating a glossy sheen and a buttery mouthfeel that lingers on the palate. Granulated and brown sugars both contribute to the caramelized sweetness, but brown sugar also adds molasses notes that deepen the chocolate flavor. Eggs act as a binder, holding the mixture together while adding richness and a silky texture.
The Unexpected Star
Unsweetened cocoa powder is the star of the show, delivering pure chocolate intensity. A splash of espresso or coffee enhances the chocolate’s depth, making it feel more complex without adding liquid that would alter the batter’s consistency. A pinch of vanilla extract rounds out the flavor, providing a subtle floral note that balances the bitterness of the cocoa.
The Final Flourish
Chocolate chips or chopped walnuts add a delightful contrast in texture, whether you prefer a crunchy bite or a gooey melt. A drizzle of sea salt on top after baking gives the brownies a caramelized edge, while a light dusting of powdered sugar can add a sweet finish for those who like a touch of sweetness. A splash of water before baking helps the batter set evenly, preventing a dry center.
Everything's prepped? Good. Let's get into the real action…
The Method — Step by Step
- Preheat your oven to 350°F (175°C) and line an 8‑inch square baking pan with parchment paper, leaving an overhang on two sides for easy removal. This step ensures even baking and a clean lift. Keep the oven rack centered to avoid overbrowning.
- In a medium bowl, whisk together the flour, cocoa powder, baking powder, and salt until the mixture is fine and free of lumps. A smooth dry mix prevents pockets of dry batter, which would ruin the final texture. Let the dry mix sit for a minute to allow the cocoa to bloom.
- In a separate saucepan, melt the butter over low heat until it’s fully liquid and slightly golden. The golden hue indicates the butter has developed nutty flavors. Remove from heat and stir in the vanilla and espresso; the mixture should emit a rich aroma.
- Whisk the sugar, brown sugar, and melted butter mixture together until the sugars dissolve and the batter becomes glossy. The glossy sheen is a sign that the sugars have fully integrated, which contributes to a smooth mouthfeel. Be careful not to overmix; the batter should remain slightly lumpy.
- Add the eggs one at a time, beating after each addition until fully incorporated. Each egg should be fully blended before adding the next to maintain a uniform batter. The batter will thicken slightly as the eggs hydrate the dry ingredients.
- Fold in the dry mixture using a rubber spatula, taking care to preserve the air pockets. The batter should be thick yet pourable. At this point, you can fold in optional ingredients like chocolate chips or nuts.
- Transfer the batter to the prepared pan, smoothing the top with a spatula. Tap the pan lightly on the counter to release air bubbles. Bake for 30 minutes, or until the edges pull away from the parchment and a toothpick inserted into the center comes out with a few moist crumbs.
- Let the brownies cool in the pan on a wire rack for 10 minutes before lifting them out using the parchment overhang. This resting period allows the structure to set, preventing cracks. Slice into squares and serve immediately or store for later enjoyment.
That's it — you did it. But hold on, I've got a few more tricks that'll take this to another level…
Insider Tricks for Flawless Results
The Temperature Rule Nobody Follows
Many bakers set their ovens too high, causing the tops to brown before the centers are fully cooked. I always preheat to 350°F (175°C) and use an oven thermometer to confirm the exact temperature. This simple step ensures even baking and a consistent fudgy texture.
Why Your Nose Knows Best
As the brownies bake, the aroma will change from sweet to slightly caramelized. When the smell reaches a deep, nutty chocolate scent, you’re close to perfection. Trust your nose; it’s a reliable indicator of doneness.
The 5-Minute Rest That Changes Everything
After baking, let the brownies rest in the pan for exactly five minutes before moving them. This brief pause allows the structure to set, reducing the risk of cracks when you lift them out. It also lets the flavors meld beautifully.
Avoiding the “Dry” Dilemma
If the brownies feel dry, it’s likely due to too much flour or overbaking. Next time, reduce the flour by a tablespoon and keep a close eye on the baking time. A quick visual check of the edges helps prevent overcooking.
The Perfect Swirl
For an extra touch of decadence, swirl a spoonful of peanut butter or Nutella into the batter before baking. The swirl creates a marbled effect and adds a creamy layer of flavor that pairs wonderfully with the chocolate.
Creative Twists and Variations
Nutty Bliss
Add a cup of chopped walnuts or pecans for a crunchy texture. The nuts bring a buttery flavor that complements the chocolate, making each bite more complex. This version is perfect for guests who love a nutty twist.
Caramel Crunch
Fold in a half cup of caramel bits or drizzle caramel sauce over the top before baking. The caramel adds a sweet, buttery layer that balances the chocolate’s richness. Serve with a scoop of vanilla ice cream for a dessert that feels indulgent.
Minty Madness
Stir in a tablespoon of peppermint extract and a handful of crushed mint candies. The mint gives a refreshing kick that cuts through the chocolate’s heaviness. This version is ideal for holiday gatherings.
Espresso Edge
Replace the vanilla with espresso powder and add a dash of cold brew coffee to the batter. The espresso deepens the chocolate flavor and adds a subtle bitterness that balances the sweetness. Coffee lovers will find this variation irresistible.
Salted Caramel Swirl
Swirl in a mixture of salted caramel and sea salt before baking. The caramel’s sweetness and the salt’s bite create a flavor profile that’s both sweet and savory. This version is great for impressing guests with something unexpected.
Almond Butter Dream
Replace some of the butter with almond butter for a nutty undertone. The almond butter also adds a subtle sweetness that complements the chocolate. This variation is perfect for those who enjoy a slightly different flavor profile.
Storing and Bringing It Back to Life
Fridge Storage
Store brownies in an airtight container at room temperature for up to four days. The airtight seal prevents the brownies from drying out and keeps the fudgy center moist. For extra freshness, place a slice of bread in the container; the bread absorbs excess moisture.
Freezer Friendly
Wrap each brownie square individually in plastic wrap and place them in a freezer bag. They can be frozen for up to three months. When ready to eat, let them thaw at room temperature for 20 minutes before serving.
Best Reheating Method
Reheat frozen brownies in a preheated oven at 300°F (150°C) for 8–10 minutes, or until warmed through. Add a tiny splash of water before reheating to create steam, which restores moisture and gives the brownies a fresh, freshly baked feel. Let them cool for a minute before slicing.